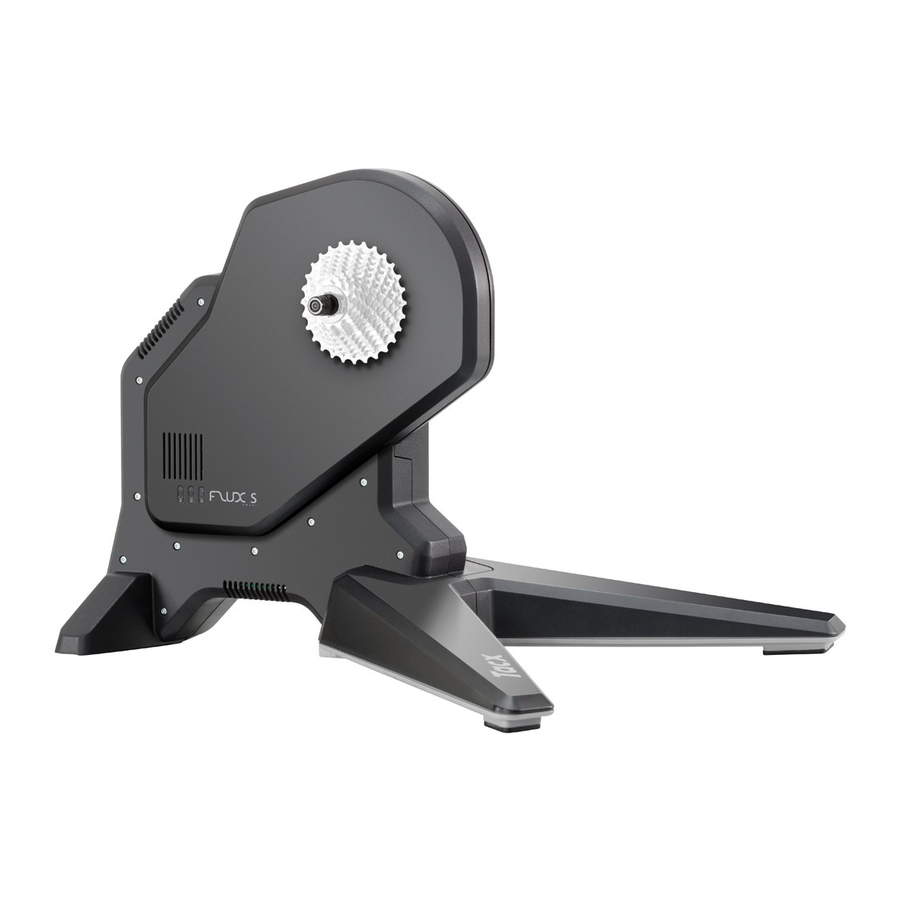
Tacx FLUX 2, FLUX S - Trainer Manual (Manual Trainer)
- 1 Trainer Parts (Bagian-Bagian Trainer)
- 2 Mounting the Cassette (Memasang Kaset)
- 3 Installing End Caps for a Thru Axle (Memasang Tutup Ujung untuk As Tembus)
- 4 Attaching Your Bike to the Trainer (Memasang Sepeda Anda ke Trainer)
- 5 Tacx Training App (Aplikasi Latihan Tacx)
- 6 Device Information (Informasi Perangkat)
- 7 References (Referensi)
- 8 Unduh manual
- 9 Dalam Bahasa Lain
Trainer Parts (Bagian-Bagian Trainer)
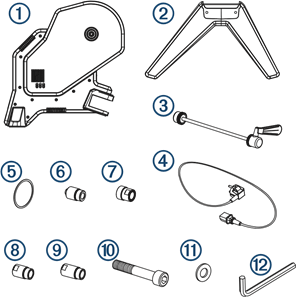
You should check the package for all the required parts. (Anda harus memeriksa paket untuk semua bagian yang diperlukan.)
 011-05424-02, 011-05424-01 011-05424-02, 011-05424-01 | Tacx FLUX 2/S trainer (trainer Tacx FLUX 2/S) |
 011-05450-01, 011-05450-02 011-05450-01, 011-05450-02 | Front legs (Kaki depan) |
 013-00928-02 013-00928-02 | Standard quick release skewer (Tusuk sate pelepas cepat standar) |
 Country-specific (Khusus negara) Country-specific (Khusus negara) | Power cable (Kabel daya) |
 213-00169-02 213-00169-02 | Cassette spacer ring (Cincin spacer kaset) |
 117-01575-02 117-01575-02 | Quick release end cap and 135 mm axle (QR x 135 NDS) (Tutup ujung pelepas cepat dan as 135 mm (QR x 135 NDS)) |
 117-01575-10 117-01575-10 | 12 mm thru-axle, drive-side end cap (12 DS) (As tembus 12 mm, tutup ujung sisi penggerak (12 DS)) |
 117-01575-12 117-01575-12 | 12 mm x 142 mm thru-axle, non-drive-side end cap (12 x 142 NDS) (As tembus 12 mm x 142 mm, tutup ujung sisi non-penggerak (12 x 142 NDS)) |
 117-01575-14 117-01575-14 | 12 mm x 148 mm thru-axle, non-drive-side end cap (12 x 148 NDS) (As tembus 12 mm x 148 mm, tutup ujung sisi non-penggerak (12 x 148 NDS)) |
 211-04965-37 211-04965-37 | Bolts (2) (Baut (2)) |
 212-00150-00 212-00150-00 | Washers (2) (Ring (2)) |
 013-00936-00 013-00936-00 | 8 mm hex key (Kunci hex 8 mm) |
Mounting the Cassette (Memasang Kaset)
 NOTE: A cassette is not included with the trainer. (CATATAN: Kaset tidak disertakan dengan trainer.)
- Place the trainer on its side with the freehub body
![]() facing up. (Letakkan trainer di sisinya dengan badan freehub
facing up. (Letakkan trainer di sisinya dengan badan freehub ![]() menghadap ke atas.)
menghadap ke atas.)

- Select an option: (Pilih opsi:)

- If you have a Shimano® or SRAM® 8, 9, or 10 speed cassette, use the standard freehub body with a spacer
![]() . (Jika Anda memiliki kaset Shimano® atau SRAM® 8, 9, atau 10 kecepatan, gunakan badan freehub standar dengan spacer
. (Jika Anda memiliki kaset Shimano® atau SRAM® 8, 9, atau 10 kecepatan, gunakan badan freehub standar dengan spacer ![]() .)
.) - If you have a Shimano or SRAM 11 or 12 speed cassette, use the standard freehub body with no spacer. (Jika Anda memiliki kaset Shimano atau SRAM 11 atau 12 kecepatan, gunakan badan freehub standar tanpa spacer.)
- If you have a different cassette style, such as Campagnolo®, SRAM XD, or XD-R, go to buy.garmin.com to purchase the compatible freehub body. (Jika Anda memiliki gaya kaset yang berbeda, seperti Campagnolo®, SRAM XD, atau XD-R, buka buy.garmin.com untuk membeli badan freehub yang kompatibel.)
- If you have a Shimano® or SRAM® 8, 9, or 10 speed cassette, use the standard freehub body with a spacer
- Mount the cassette to the trainer. (Pasang kaset ke trainer.)
You should refer to the owner's manual provided with your cassette. (Anda harus merujuk ke manual pemilik yang disertakan dengan kaset Anda.)


Installing End Caps for a Thru Axle (Memasang Tutup Ujung untuk As Tembus)
Standard 130 mm quick release end caps are mounted on the trainer. (Tutup ujung pelepas cepat standar 130 mm dipasang pada trainer.) If you have a 135 mm quick release end cap or thru axle, you can swap the end caps. (Jika Anda memiliki tutup ujung pelepas cepat 135 mm atau as tembus, Anda dapat menukar tutup ujung.)
- On the drive side, use a hex key to remove the end cap. (Di sisi penggerak, gunakan kunci hex untuk melepas tutup ujung.)
- Install the end cap
![]() . (Pasang tutup ujung
. (Pasang tutup ujung ![]() .)
.)

- On the non-drive side, select an option: (Di sisi non-penggerak, pilih opsi:)
- If the axle is 12 x 142 mm, use the end cap
![]() . (Jika asnya 12 x 142 mm, gunakan tutup ujung
. (Jika asnya 12 x 142 mm, gunakan tutup ujung ![]() .)
.) - If the axle is 12 x 148 mm, use the end cap
![]() . (Jika asnya 12 x 148 mm, gunakan tutup ujung
. (Jika asnya 12 x 148 mm, gunakan tutup ujung ![]() .)
.)

- If the axle is 12 x 142 mm, use the end cap
- Insert the end cap into the trainer, and hand tighten. (Masukkan tutup ujung ke dalam trainer, dan kencangkan dengan tangan.)
- Use a 17 mm bike wrench to tighten completely. (Gunakan kunci pas sepeda 17 mm untuk mengencangkan sepenuhnya.)

 . (Jika asnya 12 x 142 mm, gunakan tutup ujung
  . (Jika asnya 12 x 148 mm, gunakan tutup ujung
Attaching Your Bike to the Trainer (Memasang Sepeda Anda ke Trainer)

For direct-drive trainers, the rear axle must be installed properly. (Untuk trainer penggerak langsung, as belakang harus dipasang dengan benar.) Failure to tighten and firmly close the quick release lever may result in injury or property damage. (Kegagalan untuk mengencangkan dan menutup dengan kuat tuas pelepas cepat dapat mengakibatkan cedera atau kerusakan properti.) To see a video, go to www.garmin.com/tacx/axle.
- Place the trainer on a firm and level surface. (Letakkan trainer di permukaan yang kokoh dan rata.)
- Attach the front leg (Pasang kaki depan)
![]() to the trainer using the bolts (ke trainer menggunakan baut)
to the trainer using the bolts (ke trainer menggunakan baut)![]() , washers (ring)
, washers (ring)![]() , and hex key (dan kunci hex)
, and hex key (dan kunci hex)![]() .
.

- Remove the rear wheel from your bike. (Lepaskan roda belakang dari sepeda Anda.)
- Align the rear axle of the bike with the trainer frame. (Sejajarkan as belakang sepeda dengan rangka trainer.)
- Tighten and close the quick release skewer or thru axle. (Kencangkan dan tutup tusuk sate pelepas cepat atau as tembus.)
- Plug the power cable connector (Colokkan konektor kabel daya)
![]() into the Tacx FLUX 2/S port. (ke port Tacx FLUX 2/S.)
into the Tacx FLUX 2/S port. (ke port Tacx FLUX 2/S.)

- Plug the power cable into a standard wall outlet. (Colokkan kabel daya ke stopkontak dinding standar.)
The power LED is green during normal operation. (LED daya berwarna hijau selama operasi normal.) - Rotate the crank arm to check for clearance. (Putar lengan engkol untuk memeriksa jarak bebas.)
 to the trainer using the bolts (ke trainer menggunakan baut)
 , washers (ring)
 , and hex key (dan kunci hex)
 .
.


Tacx Training App (Aplikasi Latihan Tacx)
You can download the Tacx Training app to your compatible phone, tablet, or computer. (Anda dapat mengunduh aplikasi Latihan Tacx ke ponsel, tablet, atau komputer yang kompatibel.)
- Ride exciting courses without leaving your home. (Ikuti kursus yang menarik tanpa meninggalkan rumah Anda.)
- Create your own rides, workouts, and more. (Buat perjalanan, latihan, dan lainnya sendiri.)
- Manage your training, customize the default settings, and diagnose issues. (Kelola latihan Anda, sesuaikan pengaturan default, dan diagnosis masalah.)
- Sync your indoor training data with your Garmin Connect™ account. (Sinkronkan data latihan dalam ruangan Anda dengan akun Garmin Connect™ Anda.)
- Update your trainer software. (Perbarui perangkat lunak trainer Anda.)
Device Information (Informasi Perangkat)
Device Care and Storage (Perawatan dan Penyimpanan Perangkat)
- Unplug the trainer when it is not in use. (Cabut trainer saat tidak digunakan.)
- Wipe off the trainer after every use. (Seka trainer setelah setiap penggunaan.)
- Clean the trainer before storing it. (Bersihkan trainer sebelum menyimpannya.)
Specifications (Spesifikasi)
| Power supply (Catu daya) | Use the included power cable. (Gunakan kabel daya yang disertakan.) 100 to 240 v @ 50/60 Hz, 40 W |
| Operating temperature range (Rentang suhu operasi) | From -20º to 55ºC (from -4º to 131ºF) (Dari -20º hingga 55ºC (dari -4º hingga 131ºF)) |
| Wireless frequency (Frekuensi nirkabel) | 2.4 GHz @ 3 dBm maximum (2,4 GHz @ 3 dBm maksimum) |
| Water rating (Peringkat air) | IEC 60529 IP21 The device withstands incidental exposure of vertically falling water droplets. (Perangkat tahan terhadap paparan insidental tetesan air yang jatuh secara vertikal.) |
Garmin® Support Center (Pusat Dukungan Garmin®)
Go to support.garmin.com for help and information, such as product manuals, frequently asked questions, videos, and customer support. (Buka support.garmin.com untuk bantuan dan informasi, seperti manual produk, pertanyaan yang sering diajukan, video, dan dukungan pelanggan.)
© 2022 Garmin Ltd. or its subsidiaries
All rights reserved. (Semua hak dilindungi undang-undang.) Under the copyright laws, this manual may not be copied, in whole or in part, without the written consent of Garmin. (Berdasarkan undang-undang hak cipta, manual ini tidak boleh disalin, seluruhnya atau sebagian, tanpa izin tertulis dari Garmin.) Garmin reserves the right to change or improve its products and to make changes in the content of this manual without obligation to notify any person or organization of such changes or improvements. (Garmin berhak untuk mengubah atau meningkatkan produknya dan untuk membuat perubahan dalam konten manual ini tanpa kewajiban untuk memberi tahu siapa pun atau organisasi tentang perubahan atau peningkatan tersebut.) Go to www.garmin.com for current updates and supplemental information concerning the use of this product. (Buka www.garmin.com untuk pembaruan terkini dan informasi tambahan mengenai penggunaan produk ini.)
Garmin®, the Garmin Logo, and Tacx® are trademarks of Garmin Ltd. or its subsidiaries, registered in the USA and other countries. (Garmin®, Logo Garmin, dan Tacx® adalah merek dagang dari Garmin Ltd. atau anak perusahaannya, yang terdaftar di AS dan negara lain.) These trademarks may not be used without the express permission of Garmin. (Merek dagang ini tidak boleh digunakan tanpa izin tertulis dari Garmin.)
Campagnolo® is a registered trademark of Campagnolo S.r.l. Shimano® is a registered trademark of Shimano, Inc. SRAM® is a registered trademark of SRAM LLC.
This product is ANT+® certified. (Produk ini bersertifikasi ANT+®.) Visit www.thisisant.com/directory for a list of compatible products and apps. (Kunjungi www.thisisant.com/directory untuk daftar produk dan aplikasi yang kompatibel.)
M/N: T2980, T2900S

References (Referensi)
![www.garmin.com]() Tacx: How to Properly Mount your Bike Using a Quick Release Skewer | Garmin Customer Support
Tacx: How to Properly Mount your Bike Using a Quick Release Skewer | Garmin Customer Support![www.garmin.com]() Garmin International | Home
Garmin International | HomeDirectory - THIS IS ANT
![buy.garmin.com]() Garmin International | Home
Garmin International | Home![support.garmin.com]() Garmin Customer Support
Garmin Customer Support
Unduh manual
Di sini Anda dapat mengunduh versi pdf lengkap manual, mungkin berisi instruksi keselamatan tambahan, informasi garansi, aturan FCC, dll.
Unduh Tacx FLUX 2, FLUX S - Trainer Manual (Manual Trainer)


