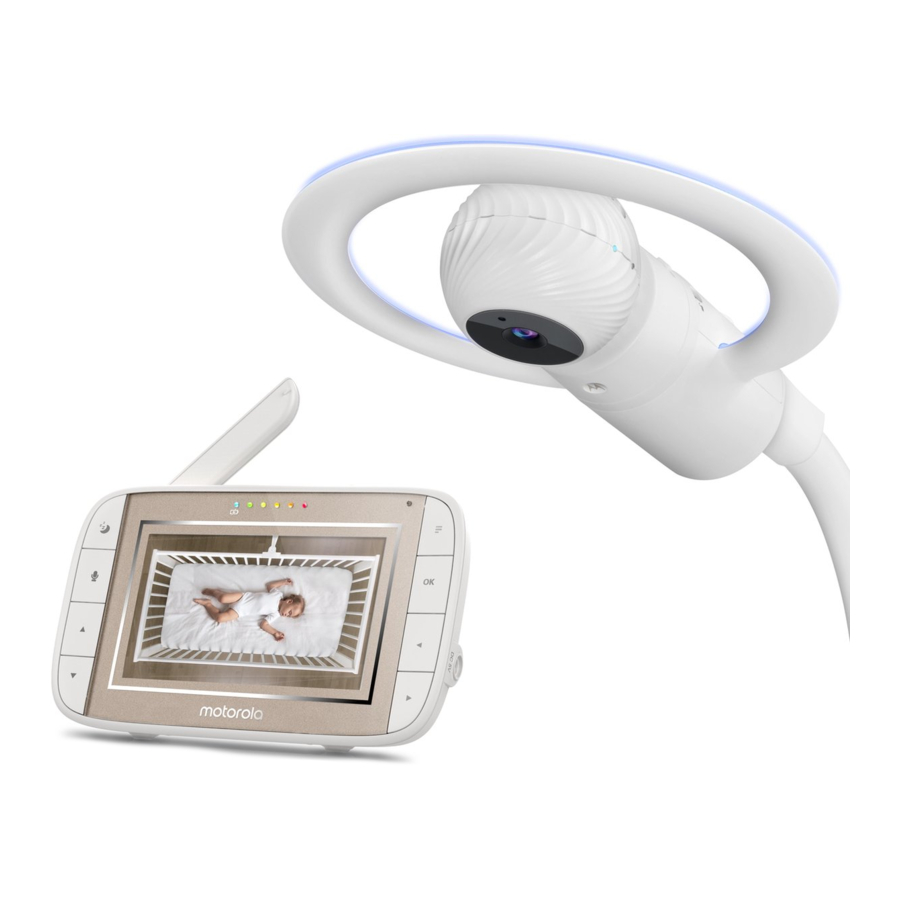
Motorola MBP944CONNECT - Baby Monitors Quick Start Guide (Greitasis pradžios vadovas)
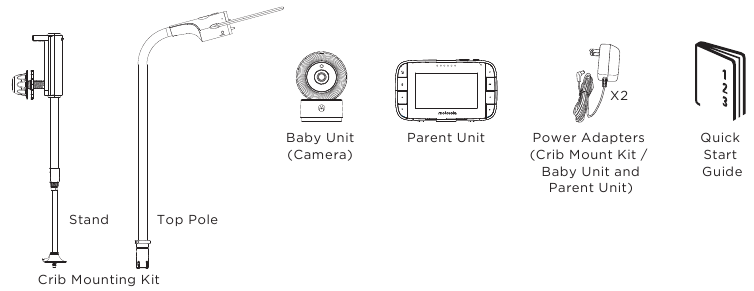
- 1 Contents Inside Box (Kas yra dėžutėje)
- 2 Setting up MBP944CONNECT (MBP944CONNECT nustatymas)
- 3 Parent Unit menu icons (Tėvų įrenginio meniu piktogramos)
- 4 Basic operation of the keys (Pagrindinis klavišų valdymas)
- 5 Setting up the Baby Unit for Wi-Fi internet viewing (Kūdikio įrenginio nustatymas Wi-Fi interneto peržiūrai)
- 6 Atsisiųsti instrukciją
- 7 Kitomis kalbomis
Contents Inside Box (Kas yra dėžutėje)

Strangulation Hazard: Children have STRANGLED in cords. Keep this cord out of the reach of children (more than 1m (3ft) away). (Pasismaugimo pavojus: vaikai PASISMaugė virvėmis. Laikykite šį laidą vaikams nepasiekiamoje vietoje (daugiau nei 1 m (3 pėdų) atstumu).
Never use extension cords with AC Adapters. Only use the AC Adapters provided. Stop using the crib mount when baby begins to push up on hands and knees. (Niekada nenaudokite ilgintuvų su kintamosios srovės adapteriais. Naudokite tik pateiktus kintamosios srovės adapterius. Nustokite naudoti lovelės laikiklį, kai kūdikis pradeda remtis rankomis ir keliais.)
Setting up MBP944CONNECT (MBP944CONNECT nustatymas)
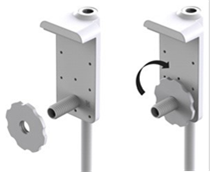
Step 1: Fasten the round adaptive plate on to the screw thread of the crib mount stand. (see note) (1 žingsnis: pritvirtinkite apvalią adapterio plokštę ant lovelės laikiklio stovo sriegio. (žr. pastabą))
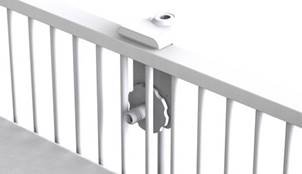
Step 2: Place the mount stand against the crib with the screw thread going through the crib bars. (2 žingsnis: padėkite laikiklio stovą prie lovelės taip, kad sriegis eitų per lovelės strypus.)
Step 3: Secure the mounting knob on to the screw thread. (3 žingsnis: pritvirtinkite tvirtinimo rankenėlę ant sriegio.)
Step 4:Keep the stand parallel and tighten the mounting knob so that the crib mount stand is secured to the crib bars. (4 žingsnis: laikykite stovą lygiagrečiai ir priveržkite tvirtinimo rankenėlę, kad lovelės laikiklio stovas būtų pritvirtintas prie lovelės strypų.)
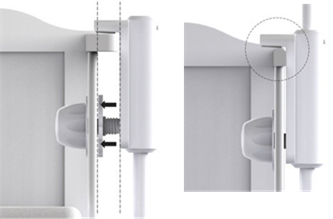

Note: Only use the adaptive plate if the top rail of your crib is too thick for the bracket. (Pastaba: naudokite adapterio plokštę tik tuo atveju, jei viršutinis jūsų lovelės bėgelis yra per storas laikikliui.)
Step 5: Extend the telescopic leg of the crib stand so the foot is secured to the floor. (5 žingsnis: ištraukite teleskopinę lovelės stovo koją, kad pėda būtų pritvirtinta prie grindų.)
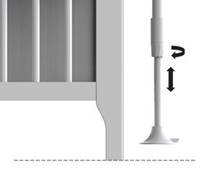
Step 6: Tighten the securing knob to lock the telescopic leg in place. (6 žingsnis: priveržkite tvirtinimo rankenėlę, kad užfiksuotumėte teleskopinę koją.)
Note: Ensure the telescopic leg is extended so the foot sits tight against the floor. (Pastaba: įsitikinkite, kad teleskopinė koja yra ištraukta taip, kad pėda tvirtai priglustų prie grindų.)
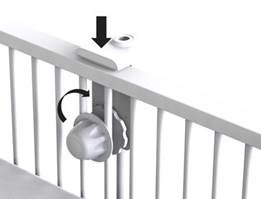
Step 7: Insert the Top Pole (with night light ring) into the crib mount stand. It will lock into place with a 'click'. (7 žingsnis: įkiškite viršutinį stulpą (su naktinės šviesos žiedu) į lovelės laikiklio stovą. Jis užsifiksuos spragtelėjimu.)
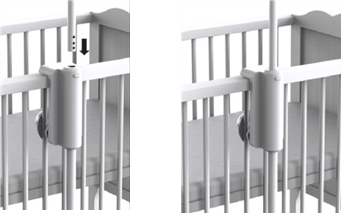
Step 8: Dock the baby unit into the top pole (with night light ring) as shown in the picture below. (8 žingsnis: įstatykite kūdikio įrenginį į viršutinį stulpą (su naktinės šviesos žiedu), kaip parodyta paveikslėlyje žemiau.)
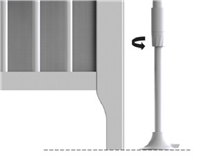
Note: Before removing the camera from the top pole. Rotate the top pole outside the crib area to avoid the possibility of the camera falling into the crib. (Pastaba: prieš išimdami kamerą iš viršutinio stulpo, pasukite viršutinį stulpą už lovelės ribų, kad kamera neįkristų į lovelę.)
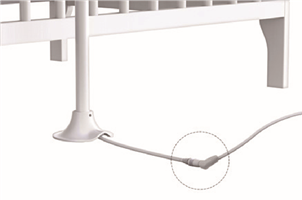
Step 9: Plug the Power Adapter (DC5V/1.5A) into the socket on Crib Mount Stand and the other end to a suitable electrical outlet. (9 žingsnis: įkiškite maitinimo adapterį (DC5V/1.5A) į lizdą ant lovelės laikiklio stovo, o kitą galą į tinkamą elektros lizdą.)
Note: When your child is older the baby unit (camera) can be removed and used without the crib mounting kit. This is 'Desk Mode'. Connect the power supply directly into the Baby Unit (camera) when using in desk mode. (Pastaba: kai jūsų vaikas paaugs, kūdikio įrenginį (kamerą) galima išimti ir naudoti be lovelės tvirtinimo rinkinio. Tai yra "Darbalaukio režimas". Kai naudojate darbalaukio režimu, prijunkite maitinimo šaltinį tiesiai prie kūdikio įrenginio (kameros).)
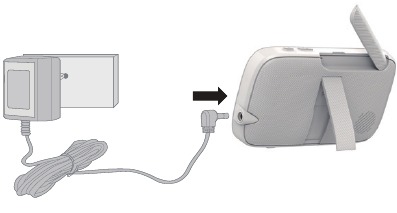
Step 10: Connect the DC plug of the power adapter(DC5V/1.5A) to the Parent Unit and the other end to a suitable electrical outlet. Press and hold the POWER button (ĮJUNGIMO/IŠJUNGIMO mygtukas) on the top of the Parent Unit to turn it ON. (viršutinėje tėvų įrenginio dalyje, kad jį įjungtumėte.)
Note: A rechargeable battery (Lithium ion battery 2000mAh) inside the Parent Unit allows you to move it without losing the link and picture from the Baby Unit. The battery gives up to 5 hours operation for the Parent Unit. We recommend you charge it for at least 16 hours before first use, or when the Parent Unit indicates the battery is low. (Pastaba: įkraunama baterija (ličio jonų baterija 2000 mAh) tėvų įrenginio viduje leidžia jį perkelti neprarandant ryšio ir vaizdo iš kūdikio įrenginio. Baterija leidžia tėvų įrenginiui veikti iki 5 valandų. Rekomenduojame ją įkrauti mažiausiai 16 valandų prieš pirmąjį naudojimą arba kai tėvų įrenginys rodo, kad baterija išsikrovusi.)
Parent Unit menu icons (Tėvų įrenginio meniu piktogramos)
 | Signal Level Indication (5 Levels). (Signalo lygio indikacija (5 lygiai).) |
 | Night Vision Mode (Video also changes to Black/White). (Naktinio matymo režimas (vaizdas taip pat pasikeičia į juodai baltą).) |
 | Talk Mode On. (Kalbėjimo režimas įjungtas.) |
 | Indicates the screen off timer is set. (Rodo, kad nustatytas ekrano išjungimo laikmatis.) |
 | Volume Level Control (8 Levels). (Garso lygio valdymas (8 lygiai).) |
 | No Baby Unit detected. (Nerastas kūdikio įrenginys.) |
 | Sleep activity monitoring. (Miego aktyvumo stebėjimas.) |
 | Battery Level Indication (4 Levels). (Baterijos lygio indikacija (4 lygiai).) |
 | Night light is ON. (Naktinė lemputė įjungta.) |
 | Night Light Brightness Control with 3 levels of selection. (Naktinės lemputės ryškumo valdymas su 3 pasirinkimo lygiais.) |
 | Night Light Colour Control with 7 colour options. (Naktinės lemputės spalvų valdymas su 7 spalvų pasirinkimais.) |
 | Night Light Colour Loop with 7 colours. (Naktinės lemputės spalvų ciklas su 7 spalvomis.) |
 | Zoom Level Control (1X, 2X). (Priartinimo lygio valdymas (1X, 2X).) |
 | LCD Brightness Level Control (8 Levels). (LCD ryškumo lygio valdymas (8 lygiai).) |
 | Audio content Playback selection - Lullabies/Soothing Sounds (Garso turinio atkūrimo pasirinkimas - Lopšinės/Raminantys garsai)  and Audio Books (ir garso knygos) and Audio Books (ir garso knygos)  . . |
 | Alarm Setting (6h, 4h, 2h, OFF) (Žadintuvo nustatymas (6h, 4h, 2h, IŠJUNGTA)) On status bar, indicates alarm set, and when flashing, that alarm time has been reached or missed. (Būsenos juostoje rodo nustatytą žadintuvą, o mirksint - kad žadintuvo laikas pasiektas arba praleistas.) |
 | Temperature scale select (°C/°F) (Temperatūros skalės pasirinkimas (°C/°F)) Readings display in BLUE, but turn RED if > 29°C / 84°F or < 14°C / 57°F. (Rodmenys rodomi MĖLYNAI, bet tampa RAUDONI, jei > 29°C / 84°F arba < 14°C / 57°F.) Displays HH °C / °F if >36°C / 97°F. (Rodo HH °C / °F, jei >36°C / 97°F.) Displays LL °C / °F if < 1°C / 34°F. (Rodo LL °C / °F, jei < 1°C / 34°F.) |
 | Camera Control (scan (Kameros valdymas (nuskaitymas)  , view (peržiūra) , view (peržiūra)  , add (pridėti) , add (pridėti)  , suppression (išjungimas) , suppression (išjungimas)  ). ). |
 | Set Screen Off Timer (Off (Nustatyti ekrano išjungimo laikmatį (Išjungtas)  , 5 min, 30 min, 60 min). , 5 min, 30 min, 60 min). |
 | View multiple cameras on screen. Available when you have more than 1 Baby Unit (Camera). (Peržiūrėkite kelias kameras ekrane. Galima, kai turite daugiau nei 1 kūdikio įrenginį (kamerą).) |
 | Light Show Projector is on. (Šviesų šou projektorius įjungtas.) |
Basic operation of the keys (Pagrindinis klavišų valdymas)
Parent Unit (Tėvų įrenginys)
 | ON/OFF button (ĮJUNGIMO/IŠJUNGIMO mygtukas) | Press and hold to switch on/off the parent unit. Press to turn the LCD screen ON/OFF. (Paspauskite ir palaikykite, kad įjungtumėte/išjungtumėte tėvų įrenginį. Paspauskite, kad įjungtumėte/išjungtumėte LCD ekraną.) |
 | Volume Down/Up buttons (Garso mažinimo/didinimo mygtukai) | Press -/+ to select volume level of the parent unit. (Paspauskite -/+, kad pasirinktumėte tėvų įrenginio garsumo lygį.) |
 | SLEEP button (MIEGO mygtukas) | Press to review the sleep activity of your baby that recorded from Camera. (Paspauskite, kad peržiūrėtumėte kūdikio miego aktyvumą, kuris buvo įrašytas iš kameros.) |
 | TALK button (KALBĖTI mygtukas) | Press and hold to talk to your baby. (Paspauskite ir palaikykite, kad pasikalbėtumėte su kūdikiu.) |
 | UP/DOWN buttons (AUKŠTYN/ŽEMYN mygtukai) | Press to adjust menu settings. (Paspauskite, kad reguliuotumėte meniu nustatymus.) |
 | MENU (MENIU) | Press to open menu options or exit the menu. (Paspauskite, kad atidarytumėte meniu parinktis arba išeitumėte iš meniu.) |
 | OK button (GERAI mygtukas) | Press to confirm a selection. (Paspauskite, kad patvirtintumėte pasirinkimą.) |
 | LEFT/RIGHT buttons (KAIRE/DEŠINE mygtukai) | Press to access different menu options. (Paspauskite, kad pasiektumėte skirtingas meniu parinktis.) |
 | RESET button (ATSTATYMO mygtukas) | Press and hold with a small pin to reset the unit. (Paspauskite ir palaikykite su mažu kaiščiu, kad atstatytumėte įrenginį.) |
| Baby Unit (Kūdikio įrenginys) | ||
 | PAIR button (SUSIEJIMO mygtukas) | When use the Baby Unit at desktop mode, press and hold to pair with the parent unit or Hubble Wi-Fi® Setup. (Kai naudojate kūdikio įrenginį darbalaukio režimu, paspauskite ir palaikykite, kad susietumėte su tėvų įrenginiu arba Hubble Wi-Fi® sąranka.) |
 | ON/OFF button (ĮJUNGIMO/IŠJUNGIMO mygtukas) | Slide the power switch to switch on/off the Unit. (Pastumkite maitinimo jungiklį, kad įjungtumėte/išjungtumėte įrenginį.) |
| Top Pole (Viršutinis stulpas) | ||
 | Night Light button (Naktinės lemputės mygtukas) | Press once to switch Night Light on, press repeatedly to select Night Light with 7 colour options. (Vieną kartą paspauskite, kad įjungtumėte naktinę lemputę, kelis kartus paspauskite, kad pasirinktumėte naktinę lemputę su 7 spalvų pasirinkimais.) |
 | Light Show Projector button (Šviesų šou projektoriaus mygtukas) | Press to switch Light Show on or off, press repeatedly to select projector scenes. When use the Baby Unit at dock mode, press and hold to pair with the (Paspauskite, kad įjungtumėte arba išjungtumėte šviesų šou, kelis kartus paspauskite, kad pasirinktumėte projektoriaus scenas. Kai naudojate kūdikio įrenginį doko režimu, paspauskite ir palaikykite, kad susietumėte su) |
 | UNLOCK/LOCK Switch (ATRAKINIMO/UŽRAKINIMO jungiklis) | parent unit or Hubble Wi-Fi® Setup. Slide the switch to UNLOCK to release baby unit. (tėvų įrenginiu arba Hubble Wi-Fi® sąranka. Pastumkite jungiklį į ATRAKINTI, kad atlaisvintumėte kūdikio įrenginį.) |
Setting up the Baby Unit for Wi-Fi® internet viewing (Kūdikio įrenginio nustatymas Wi-Fi® interneto peržiūrai)
- After the Baby Unit docked on the top pole (with Night Light ring) then connect the small plug of the power adapter to the socket at the end of the Crib Mount Stand and the other end to the electrical outlet. Ensure the Power ON/OFF switch is "ON" position. (Kai kūdikio įrenginys prijungtas prie viršutinio stulpo (su naktinės šviesos žiedu), prijunkite mažą maitinimo adapterio kištuką prie lizdo lovelės laikiklio stovo gale, o kitą galą prie elektros lizdo. Įsitikinkite, kad maitinimo ĮJUNGIMO/IŠJUNGIMO jungiklis yra "ON" padėtyje.)
- Install Hubble for Motorola Monitors App on your Android™ Devices / iPhone® / iPad® (Įdiekite "Hubble for Motorola Monitors" programėlę savo "Android™" įrenginiuose / "iPhone®" / "iPad®")


- Scan the QR code with your smart device and download (Nuskaitykite QR kodą savo išmaniuoju įrenginiu ir atsisiųskite) Hubble for Motorola Monitors App from the App Store for iOS devices or from the Google Play devices.
- Install Hubble for Motorola Monitors App on your device. (Įdiekite "Hubble for Motorola Monitors" programėlę savo įrenginyje.)
- Monitor on Compatible Smartphones and Tablets (Stebėkite suderinamuose išmaniuosiuose telefonuose ir planšetiniuose kompiuteriuose)

- Open the Hubble for Motorola Monitors App on your compatible smartphone or tablet. (Atidarykite Hubble for Motorola Monitors programėlę savo suderinamame išmaniajame telefone arba planšetiniame kompiuteryje.)
- Follow the in-app instructions to create your Hubble account and connect to MBP944CONNECT. (Vykdykite programėlės instrukcijas, kad sukurtumėte savo "Hubble" paskyrą ir prisijungtumėte prie MBP944CONNECT.)
- Log in to your account on your compatible smartphone or tablet to access your live video stream. (Prisijunkite prie savo paskyros suderinamame išmaniajame telefone arba planšetiniame kompiuteryje, kad pasiektumėte tiesioginę vaizdo transliaciją.)

Please take note of the following minimum system requirements: (Atkreipkite dėmesį į šiuos minimalius sistemos reikalavimus:)
Smartphones/Tablets: iOS 8, Android™ 5.0 (Išmanieji telefonai/planšetiniai kompiuteriai: iOS 8, Android™ 5.0)
Wi-Fi® requirements: (Wi-Fi® reikalav
Atsisiųsti instrukciją
Čia galite atsisiųsti visą pdf instrukcijos versiją, kurioje gali būti papildomų saugos instrukcijų, garantijos informacijos, FCC taisyklių ir kt.
Atsisiųsti Motorola MBP944CONNECT - Baby Monitors Quick Start Guide (Greitasis pradžios vadovas)


