How to Change Wi-Fi on Your TP-Link Tapo C200 Camera
Welcome to our comprehensive guide on changing the Wi-Fi network for your TP-Link Tapo C200 camera.
Step 1: Open the Tapo App and Select Your Camera
To begin, locate and open the Tapo app on your smartphone or tablet. If you're using an iPhone or an Android device, look for the app icon, which should be present on the home screen or within your app drawer. Once opened, find your Tapo C200 camera from the list provided within the app. This step ensures that you're accessing the correct device for the Wi-Fi update process.

Step 2: Access Camera Settings via the Gear Icon
In the top-right corner of the Tapo app interface, tap on the gear icon to open the settings for your Tapo C200 camera. Here, you can review the current network connection details. Unfortunately, the app doesn't offer a direct option to change the network. Instead, we must proceed with resetting the camera to change the Wi-Fi settings.
Step 3: Remove and Reset the Camera
Scroll to the bottom of the settings page and select 'Remove Camera' (remove camera). Confirm this action to reset your camera to its factory settings. After completing this reset, you'll need to set up your camera anew. Don't worry, we'll guide you through the setup again shortly.

Step 4: Re-add Your Camera in the Tapo App
Once the camera is reset, go back to the main screen of the Tapo app and tap on the '+' button. In Indoor Cameras select Tapo C200 from the list of available devices. Now, please be patient and wait until the LED lamp on your camera starts blinking in red-green sequences. This indicates the camera is ready for a new setup.


Step 5: Connect Your Phone to the Camera's Wi-Fi
If your app prompts you to connect the camera to Wi-Fi, go ahead and select your preferred network. In case the prompt doesn't appear, manually connect your phone to the camera's Wi-Fi, which might be labelled as something like 'Tapo_XXXX.' To do this, open your phone's Wi-Fi settings, locate the network, and tap to connect.

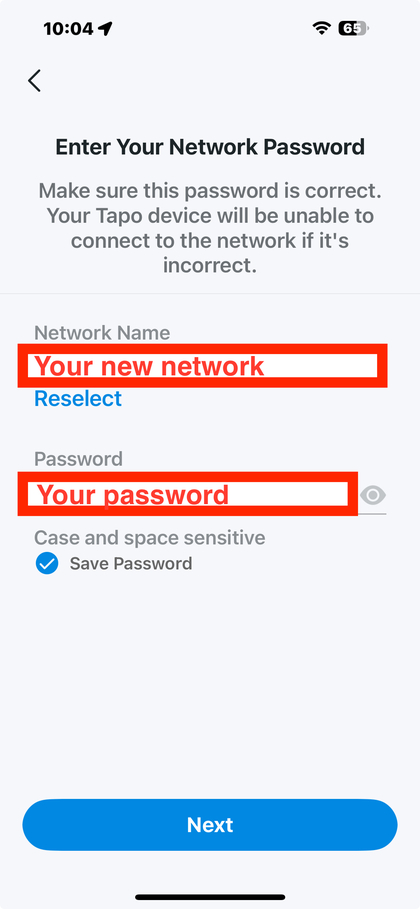
Step 6: Select Your New Wi-Fi Network
At this stage, within the app, choose the specific Wi-Fi network you wish your Tapo C200 camera to connect to. Enter the necessary password if prompted, and ensure the connection is successful. Congratulations, your camera should now be online with the newly configured network.