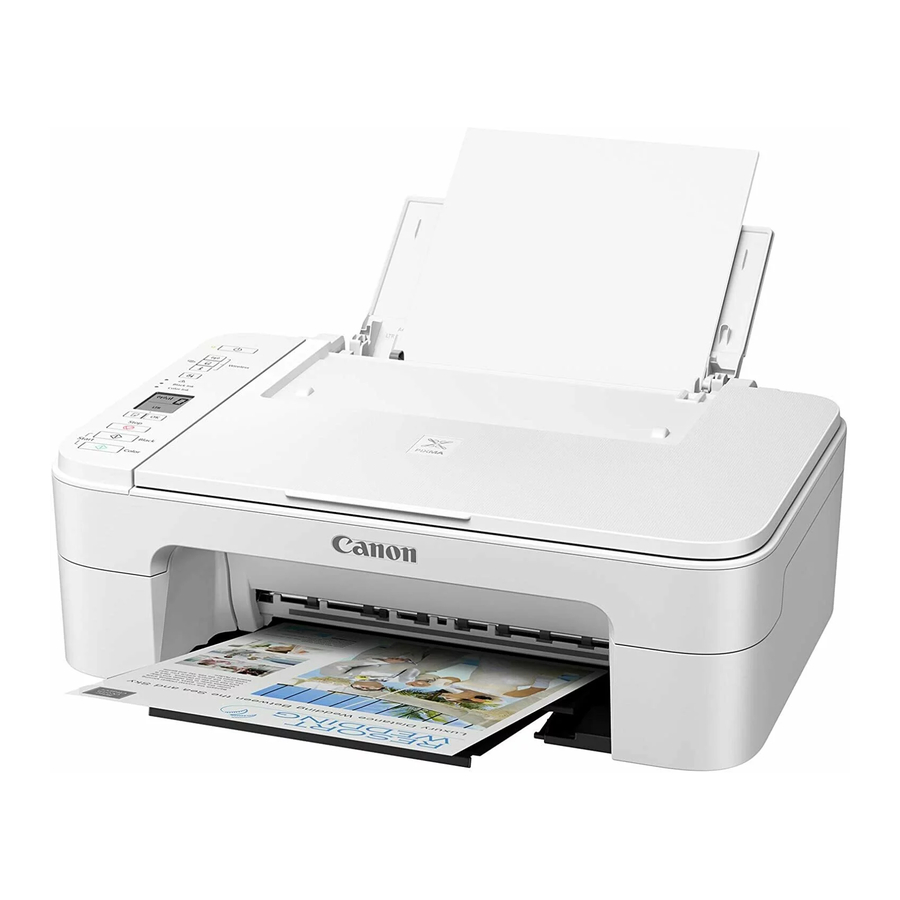
Canon PIXMA TS3300 Series Printer Getting Started (Canon PIXMA TS3300 сериялы принтерін іске қосу)
-
1
Installing the Printer (Принтерді орнату)
- 1.1 Checking Included Items (Кіретін элементтерді тексеру)
- 1.2 Removing Packing Materials (Орау материалдарын алып тастау)
- 1.3 Turning on the Printer (Принтерді қосу)
- 1.4 Installing the FINE Cartridges (FINE картридждерін орнату)
- 1.5 Loading Paper (Қағазды салу)
- 1.6 Preparing for Connection (Қосылымға дайындық)
- 2 Connecting to a Computer, Smartphone or Tablet (Компьютерге, смартфонға немесе планшетке қосылу)
- 3 Нұсқаулықты жүктеп алу
- 4 Басқа тілдерде
Online Setup (Онлайн орнату)
Detailed instructions and videos are available on the Canon website. (Толық нұсқаулар мен видеоларды Canon веб-сайтында табуға болады.)
Setup a Computer (Компьютерді орнату)

https://ij.start.canon
Setup a Smartphone (Смартфонды орнату)
Read Safety and Important Information first. (Алдымен Safety and Important Information (Қауіпсіздік және маңызды ақпарат) бөлімін оқыңыз.)
Installing the Printer (Принтерді орнату)

Holding the Printer (Принтерді ұстау)

 Instructional Videos (Оқыту бейнелері)
Checking Included Items (Кіретін элементтерді тексеру)
- FINE cartridges (FINE картридждері)
![]()
- Power cord (Қуат сымы)
- Setup CD-ROM for Windows (Windows үшін орнату CD-ROM)
- Safety and Important Information (Қауіпсіздік және маңызды ақпарат)
- Getting Started (this manual) (Жұмысты бастау (осы нұсқаулық))
Removing Packing Materials (Орау материалдарын алып тастау)

- Remove and dispose of any packing materials and orange tape from the printer's exterior. (Принтердің сыртынан барлық орау материалдарын және қызғылт сары түсті скотчты алып тастаңыз.)
- Open the cover. (Қақпақты ашыңыз.)

- Remove and dispose of the orange tape and protective material inside. (Ішіндегі қызғылт сары түсті скотчты және қорғаныш материалын алып тастаңыз.)

- Close the cover. (Қақпақты жабыңыз.)
![]()


Turning on the Printer (Принтерді қосу)

- Connect the power cord. (Қуат сымын қосыңыз.)

At this time, do not connect any other cables. (Бұл уақытта басқа кабельдерді қоспаңыз.) - Press the ON button. (ON (ҚОСУ) түймесін басыңыз.)

If E > 0 > 9 appears on the screen, press the ON button to turn off the printer, and then redo from step 2 of "Removing Packing Materials". (Егер экранда E > 0 > 9 пайда болса, принтерді өшіру үшін ON (ҚОСУ) түймесін басыңыз, содан кейін "Removing Packing Materials" (Орау материалдарын алып тастау) бөлімінің 2-қадамынан қайталаңыз.)


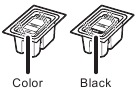
Installing the FINE Cartridges (FINE картридждерін орнату)

- Open the cover. (Қақпақты ашыңыз.)


- Remove the Color FINE cartridge from the container. (Түрлі-түсті FINE картриджін контейнерден алыңыз.)
- Remove the protective tape. (Қорғаныш таспасын алып тастаңыз.)
Be careful of ink on the protective tape. (Қорғаныш таспасындағы сияға абай болыңыз.)

- Insert the Color FINE cartridge into the FINE cartridge holder on the left-hand side at a slight upward angle. (Түрлі-түсті FINE картриджін сол жақтағы FINE картридж ұстағышына сәл жоғары бұрышпен салыңыз.)
- Push the FINE cartridge in and up firmly until it snaps into place. (FINE картриджін орнына түскенше мықтап итеріңіз.)
Confirm that the FINE cartridge is straight and level. (FINE картриджінің түзу және тегіс екеніне көз жеткізіңіз.)
- Repeat steps 2 to 3 to install the Black FINE cartridge on the right-hand side. (Оң жақтағы Black (Қара) FINE картриджін орнату үшін 2-3 қадамдарды қайталаңыз.)

- Close the cover. (Қақпақты жабыңыз.)
![]()
If E > 0 > 4 appears on the screen, return to step 3 of "Installing the FINE Cartridges" and confirm that the Color and Black FINE cartridges are installed correctly. (Егер экранда E > 0 > 4 пайда болса, "Installing the FINE Cartridges" (FINE картридждерін орнату) бөлімінің 3-қадамына оралыңыз және Color (Түрлі-түсті) және Black (Қара) FINE картридждерінің дұрыс орнатылғанын растаңыз.)


Loading Paper (Қағазды салу)

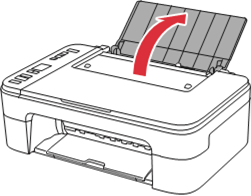
- Open the paper support. (Қағаз тіреуін ашыңыз.)

- Slide the paper guide to the left. (Қағаз бағыттаушысын солға жылжытыңыз.)

![]()
- Load Letter or A4 sized plain paper against the right edge with the print side facing up. (Оң жақ шетіне Letter немесе A4 өлшемді қарапайым қағазды басып шығару жағын жоғары қаратып салыңыз.)
- Slide the paper guide to align it with the side of the paper stack. (Қағаз бағыттаушысын қағаз үйіндісінің жағымен туралау үшін жылжытыңыз.)
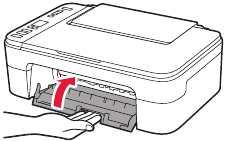
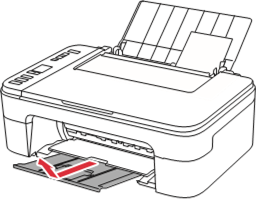
- Pull out the paper output tray. (Қағаз шығару науасын тартыңыз.)
![]()
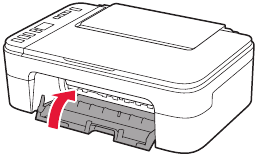
- Open the output tray extension. (Шығару науасының ұзартқышын ашыңыз.)
![]()


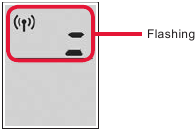
Preparing for Connection (Қосылымға дайындық)
- Confirm that the screen appears as shown below. (Экранның төменде көрсетілгендей пайда болғанын растаңыз.)
![]()
Connecting to a Computer, Smartphone or Tablet (Компьютерге, смартфонға немесе планшетке қосылу)

What device are you connecting? (Қандай құрылғыны қосып жатырсыз?)
 → Connecting to a Computer (→ Компьютерге қосылу)
 → Connecting to a Smartphone (→ Смартфонға қосылу)
To use your printer without connecting to any other devices. → "No Device Connected" (Принтеріңізді басқа құрылғыларға қосылмай пайдалану үшін. → "No Device Connected" ("Құрылғы қосылмаған"))
Connecting to a Computer (Компьютерге қосылу)

If you are using multiple computers, perform these steps on each computer. (Егер сіз бірнеше компьютерді пайдаланып жатсаңыз, бұл қадамдарды әрбір компьютерде орындаңыз.)
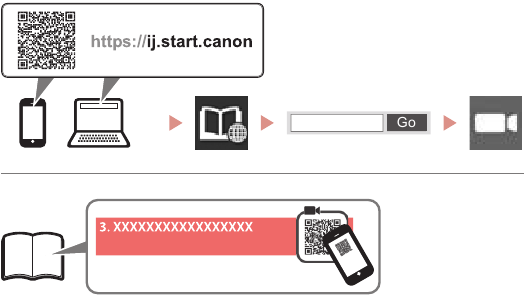
- Access the Canon website from a computer. (Компьютерден Canon веб-сайтына кіріңіз.)
![]()
https://ij.start.canon - Select (Таңдау)
![]() Set Up (Орнату).
Set Up (Орнату). - Enter your printer's model name and click Go. (Принтеріңіздің үлгі атауын енгізіп, Go (Өту) түймесін басыңыз.)
- Click Start (Бастау).
- Click If you have already prepared your printer, go to Connect. (Принтеріңізді дайындап қойсаңыз, Connect (Қосылу) бөліміне өтіңіз.)
![]() Note (Ескертпе)
Note (Ескертпе)
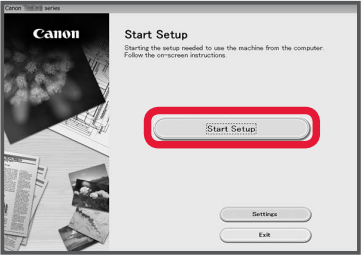
The following steps are for Windows (except Windows 10 in S mode) and macOS users. For other operating systems, continue setup by following the on-screen instructions instead. (Төмендегі қадамдар Windows (Windows 10 S режимінен басқа) және macOS пайдаланушыларына арналған. Басқа операциялық жүйелер үшін орнатуды экрандағы нұсқауларды орындау арқылы жалғастырыңыз.) - Click Download (Жүктеп алу).
- Run the downloaded file. (Жүктеп алынған файлды іске қосыңыз.)
- Click Start Setup (Орнатуды бастау).
![]()
- Follow the on-screen instructions. (Экрандағы нұсқауларды орындаңыз.)
- These operations may take some time. (Бұл операциялар біраз уақыт алуы мүмкін.)
- To connect to a smartphone as well, see "Connecting to a Smartphone". (Смартфонға да қосылу үшін "Connecting to a Smartphone" ("Смартфонға қосылу") бөлімін қараңыз.)


Using the Setup CD-ROM for Windows (Windows үшін орнату CD-ROM-ын пайдалану)
Double click EasySetup.exe in the CD-ROM, and then continue from step 3. If you do not have an internet connection, open the win folder in the CD-ROM and double click SETUP.exe. This will install the printer driver. (CD-ROM ішіндегі EasySetup.exe файлын екі рет басыңыз, содан кейін 3-қадамнан бастаңыз. Егер сізде интернет байланысы болмаса, CD-ROM ішіндегі win қалтасын ашып, SETUP.exe файлын екі рет басыңыз. Бұл принтер драйверін орнатады.)
Connecting to a Smartphone (Смартфонға қосылу)

If you are using multiple smartphones, perform these steps on each smartphone. (Егер сіз бірнеше смартфонды пайдаланып жатсаңыз, бұл қадамдарды әрбір смартфонда орындаңыз.)
Prepare the following before starting. (Бастамас бұрын төмендегілерді дайындаңыз.)
- Enable the Wi-Fi setting on your smartphone. (Смартфоныңыздағы Wi-Fi параметрін қосыңыз.)
- Connect your smartphone to the wireless router (if you have a wireless router). (Смартфоныңызды сымсыз маршрутизаторға қосыңыз (егер сізде сымсыз маршрутизатор болса).)
Refer to your smartphone and wireless router manuals for more details. (Қосымша мәліметтер алу үшін смартфоныңыз бен сымсыз маршрутизаторыңыздың нұсқаулықтарын қараңыз.)
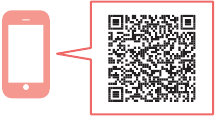
- Install the "Canon PRINT Inkjet/SELPHY" app on your smartphone. (Смартфоныңызға "Canon PRINT Inkjet/SELPHY" қолданбасын орнатыңыз.)
- Scan the QR code shown below to access the Canon website, and then download the app. (Canon веб-сайтына кіру үшін төменде көрсетілген QR кодын сканерлеңіз, содан кейін қолданбаны жүктеп алыңыз.)
![]()
- Scan the QR code shown below to access the Canon website, and then download the app. (Canon веб-сайтына кіру үшін төменде көрсетілген QR кодын сканерлеңіз, содан кейін қолданбаны жүктеп алыңыз.)
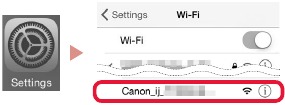
- Open your smartphone's Wi-Fi settings. Tap the network name (SSID) that starts with "Canon_ij_". (Смартфоныңыздың Wi-Fi параметрлерін ашыңыз. "Canon_ij_" деп басталатын желі атауын (SSID) түртіңіз.)
If "Canon_ij_" does not appear, proceed to step 3. ("Canon_ij_" пайда болмаса, 3-қадамға өтіңіз.)
(Example of iOS screen) ((iOS экранының мысалы))
![]()
- Open the installed app. (Орнатылған қолданбаны ашыңыз.)
![]()
- Follow the on-screen instructions in the app to add your printer. (Принтеріңізді қосу үшін қолданбадағы экрандағы нұсқауларды орындаңыз.)


Once you have added your printer, you can print from your smartphone. (Принтеріңізді қосқаннан кейін, смартфоныңыздан басып шығара аласыз.)
To print photos, see "Loading Photo Paper" ("Фотоқағазды салу" бөлімін қараңыз.)
No Device Connected (Құрылғы қосылмаған)
- Press the Stop (Тоқтату) button.
- Confirm that the screen appears as shown below. (Экранның төменде көрсетілгендей пайда болғанын растаңыз.)
![]()

Loading Photo Paper (Фотоқағазды салу)
- Open the paper support. (Қағаз тіреуін ашыңыз.)
![]()
- Slide the paper guide to the left. (Қағаз бағыттаушысын солға жылжытыңыз.)


- Load several sheets of photo paper against the right edge with the print side facing up. (Оң жақ шетіне бірнеше парақ фотоқағазды басып шығару жағын жоғары қаратып салыңыз.)
- Slide the paper guide to align it with the side of the paper stack. (Қағаз бағыттаушысын қағаз үйіндісінің жағымен туралау үшін жылжытыңыз.)
- Press the Paper Select (Қағазды таңдау) button, select a paper size, and then press the OK (Жарайды) button. (Paper Select (Қағазды таңдау) түймесін басыңыз, қағаз өлшемін таңдаңыз, содан кейін OK (Жарайды) түймесін басыңыз.)

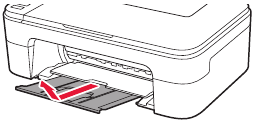
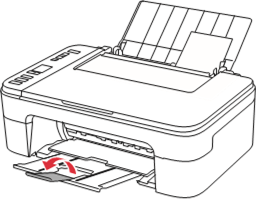
- Pull out the paper output tray. (Қағаз шығару науасын тартыңыз.)
![]()
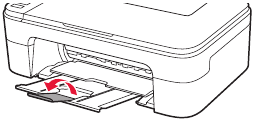
- Open the output tray extension. (Шығару науасының ұзартқышын ашыңыз.)
![]()


If Print Results Are Unsatisfactory (Егер басып шығару нәтижелері қанағаттанарлықсыз болса)
Perform Print Head Alignment if straight lines are crooked or colors are inconsistent, or print results are otherwise not what you expected. (Түзу сызықтар қисық болса немесе түстер сәйкес келмесе немесе басып шығару нәтижелері сіз күткендей болмаса, Print Head Alignment (Басып шығару басын туралау) функциясын орындаңыз.)
For details, click Maintenance (Техникалық қызмет көрсету) on the Online Manual (Онлайн нұсқаулық) and refer to If Printing Is Faint or Uneven > Aligning the Print Head. (Толық ақпарат алу үшін Online Manual (Онлайн нұсқаулық) ішіндегі Maintenance (Техникалық қызмет көрсету) түймесін басыңыз және If Printing Is Faint or Uneven (Егер басып шығару күңгірт немесе біркелкі
Нұсқаулықты жүктеп алу
Мұнда нұсқаулықтың толық pdf нұсқасын жүктеп алуға болады, онда қосымша қауіпсіздік нұсқаулары, кепілдік туралы ақпарат, FCC ережелері және т.б. болуы мүмкін.


