Anker NEBULA X1, D2351 Manual
- 1 At a Glance
- 2 Getting Started
- 3 Google Cast
- 4 Wireless Screen Mirroring
- 5 Bluetooth Speaker Mode
- 6 Pairing a Remote and Bluetooth Accessories
- 7 Using the Electronic Micro Gimbal
- 8 Playing Video from HDMI/USB Devices
- 9 Using Spatial Adaptation
- 10 Using Spatial Recall
- 11 Important Safety Instructions
- 12 Scan for Support
- 13 References
- 14 Download manual
- 15 In Other Languages
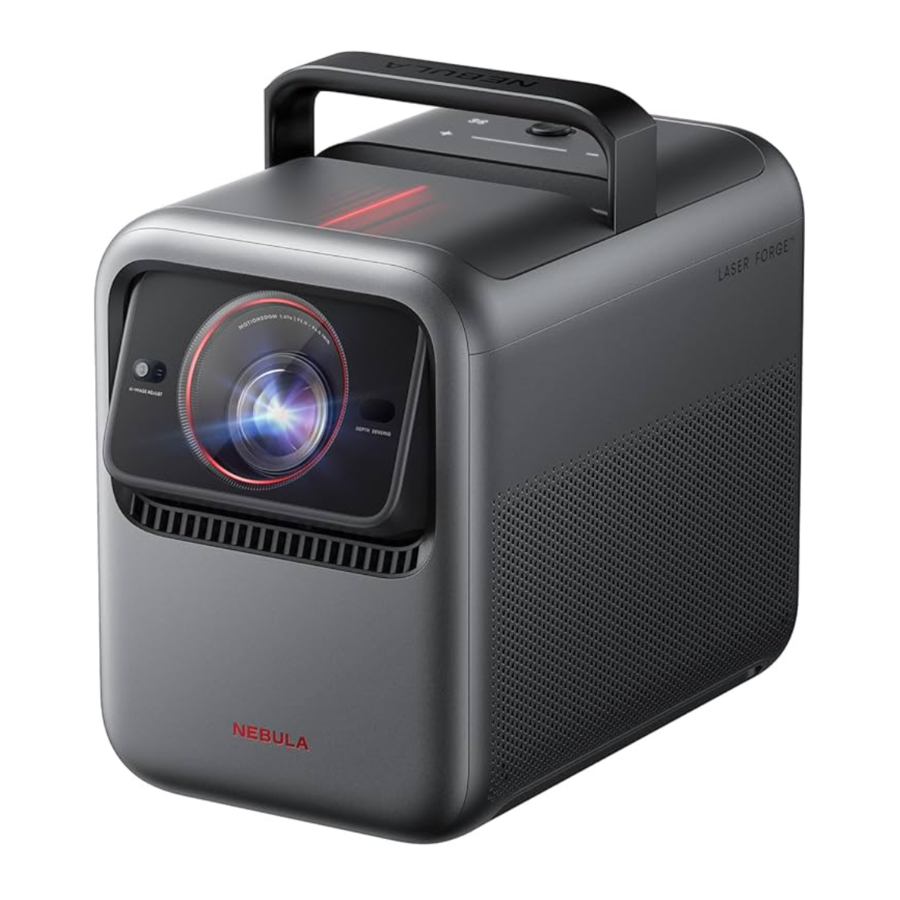
At a Glance
Front View

Rear View

Top View


 The touch-sensitive panel will light up when the projector is on.
Bottom View

 | Electronic Fully-Automated Micro Gimbal | ||
 | Handle |  | USB-C |
 | Lens |  | Audio/Optical |
 | Speaker |  | Navigation & Selection |
 | Illuminance and Image Sensors |  | Power Button |
 | ToF (Time of Flight) Sensor |  | Volume Control |
 | DC IN |  | Auto Image Adjustment |
 | HDMI 1 |  | Return Button |
 | HDMI 2 (eARC) |  | 1/4" Tripod Mount |
 | USB-A |  | 4 M4 Mounts for Ceiling Mounting (Recommended Minimum Bolt Length: 6mm) |
Remote Control

- Status Indicator
- Microphone
- Power
- Press to power on/off, switch to standby mode, or wake up.
- Navigation
- Control the cursor on the screen.
- Return
- Return to previous page.
- Volume Down
- Press to reduce volume.
- Streaming Apps
- Press to open YouTube, Netflix, or Prime Video.
- Auto Image Adjustment
- Press to enable auto image adjustment.
- Long press to perform manual adjustment.
- Google Assistant
- Press and hold to talk to Google Assistant.
- Confirm
- Press to select, pause, or resume.
- Home
- Press to go to the home page.
- Settings
- Press to go to settings.
- Volume Up
- Press to increase volume.
- Mute
- Press to mute/unmute the sound.
Getting Started
Placement
Place this device on a stable, flat surface, and point it squarely toward the projection surface. For best results, the projection surface should be white. This projector features an optical zoom lens that allows you to adjust the throw ratio of your projector from 0.9:1 to 1.5:1.
| Recommended Distance between Device and Projection Surface | |||
| 60" | 120" | 150" | 300" |
| 1.2 - 2.0 m (3.9 - 6.6 ft) | 2.4 - 4.0 m (7.9 - 13.1 ft) | 3.0 - 5.0 m (9.8 - 16.4 ft) | 6.0 - 10 m (19.7 - 32.8 ft) |
Prepare Remote Control
- Slide down to open the battery compartment.
![]()
- Insert two AAA batteries, matching the polarity (+/-) as indicated.
![]()


Connect to Power

Plug the cord into the adaptor. Then connect the projector to the power supply. When successfully connected to the power supply, the power button on the projector will turn red.
Power On/Off

- Power On: Press the power button once.
![information]() When the projector is powered on, the power button will turn steady white.
When the projector is powered on, the power button will turn steady white. - Power Off:
- Press and hold the power button for 3 seconds (wait for the on-screen prompt).
- Confirm power off with the navigation button or wait 15 seconds for automatic power off.
- Standby Mode: Short press the power button to enter standby mode.
Control the Device with the NEBULA Connect App


Download the NEBULA Connect app to control the projector using a smartphone.

Easily control your projector via the NEBULA Connect app on your smartphone.
Network Settings
Use the following methods to connect the projector to a wireless network.
- Press the Settings button on the remote, and turn on Wi-Fi.
- Open NEBULA Connect app, select your projector model, then go to Settings and turn on Wi-Fi.
Google Cast
You can wirelessly cast photos, videos, and music from your phone or tablet to your projector.

- Make sure the projector and your phone are connected to the same wireless network.
- Play a video on your streaming app and then tap the cast icon on the screen
- Select "NEBULA X1" to play the content on your projector.
Certain content may be unavailable due to copyright restrictions. In this case, you can install the app on your projector to stream content.
Wireless Screen Mirroring
You can mirror your phone's screen on your projector.
To enable screen mirroring, please make sure the projector and your phone are connected to the same wireless network.
For iOS devices:
- Download and open the NEBULA Cast app on your device.
- Open your device's control center and tap "Screen Mirroring."
- Click on "NEBULA X1" in the device list.
For Android devices:
- Open the Google Home app and select "NEBULA X1."
- Tap "Cast My Screen" to start casting.
Copyrighted and DRM-protected content from streaming services like Netflix and Disney+ cannot be mirrored.
Bluetooth Speaker Mode
The projector can also be used as a Bluetooth speaker.
- Go to All Settings > Display & Sound > Sound >Turn on the Bluetooth Speaker Mode to switch your Nebula projector from Projector mode to Bluetooth Speaker mode. Alternatively, you can go to Dashboard > Sound > Turn on the Bluetooth Speaker Mode.
- Enable Bluetooth on your smartphone and select NEBULA X1.
Pairing a Remote and Bluetooth Accessories
You can connect external Bluetooth accessories to your projector including speakers, headphones, and keyboards.
- Go to Settings > Remotes & Accessories > Pair Accessory.
- Put your Remote or Bluetooth accessory into pairing mode.
- Select the device that you want to connect to.
Using the Electronic Micro Gimbal
The built-in micro gimbal adjusts the projected image position automatically during Screen Fit and Spatial Adaptation.
For precise vertical image adjustments, you can adjust manually under Settings > Projector > Move & Zoom.

Please do not manually push or adjust the micro gimbal, and keep your fingers away from the micro gimbal during operation.
Playing Video from HDMI/USB Devices

This projector supports connections with various HDMI playback devices such as TV sticks, TV boxes, DVD players, set-top boxes (STB), game consoles, and more.
With this projector, you can also enjoy music, video, and pictures on a USB storage device (not included).
When using a USB flash drive, ensure that the USB drive is in FAT32 format.
The HDMI 2 (eARC) port supports the connection of sound systems for audio return capabilities.
Note: You may need to change the connection mode in your sound system settings to eARC.
Using Spatial Adaptation

The projector will scan the projection surface and automatically adjust the screen size and position for best results.
Go to Settings > Projector > Spatial Adaptation > Start Spatial Adaptation to find the optimal projection position for your space.
Using Spatial Recall
Save the current screen size, position, and wall colour adaptation settings. Next time the projector is placed in a similar position, you can quickly restore the saved settings.
Go to Settings > Projector > Spatial Recall.
For best results with Spatial Recall, ensure the projector is placed close to its original position.
Important Safety Instructions
- Unless specifically indicated that it is safe to do so in the user guide or instruction manual, do not use this device in an environment that exceeds the recommended low or high temperature.
- Unless specifically indicated that it is safe to do so in the user guide or instruction manual, avoid exposing your device to direct sunshine or excessively wet environments.
- The suitable temperature for the equipment is 0°C to 35°C (32°F to 95°F) for the projector.
- The suitable temperature for the equipment is 113°F / 45°C maximum for the remote.
- When supplying, please place the equipment in an environment that has a normal room temperature and good ventilation.
- The power supply should be installed near the equipment and for pluggable equipment, the socket-outlet must be easily accessible.
- Before you make or change any connections, ensure that all devices are disconnected from the power outlet.
- Possibly hazardous optical radiation emitted from this product may be harmful to the eyes. Do not stare at operating bearm.
- Do not open the enclosure of the product. When the enclosure of the product is damaged, please do not use it anymore.
- Please ensure that you only use the adapter provided by the manufacturer. Using an unauthorized adapter may be dangerous and violate the Terms of Use and the product warranty.
![]()
Laser inside, be aware of the risk of skin or corneal burns.- Do not open the enclosure of laser module inside the product.
- When the enclosure of laser module inside the product is damaged, please do not use it anymore.
- Potential hazards may exist during lamp or product servicing.
- Service shall be performed only by authorized, trained servicing, trained servicing personnel.
- Do not use the equipment in any way other than described herein in order to avoid personal injury or property damage.
- User should comply with the laws and regulations of the corresponding countries and regions where the equipment is located (used), abide by professional ethics, pay attention to safety obligations, and strictly prohibit the use of our products or equipment for any illegal purposes. Our company will not be responsible for any violators' legal liability under any circumstances.

Remote controller

RISK OF EXPLOSION IF BATTERY IS REPLACED BY AN INCORRECT TYPE. DISPOSE OF USED BATTERIES ACCORDING TO THE INSTRUCTIONS.
Scan for Support

App
FAQs
Contact Us
Support Videos
References
Download manual
Here you can download full pdf version of manual, it may contain additional safety instructions, warranty information, FCC rules, etc.
Download Anker NEBULA X1, D2351 Manual


