PIT BOSS COMPETITION Series, TITAN PB1600CST Manual
- 1 PACKAGE CONTENTS
- 2 SPECIFICATIONS
- 3 GETTING TO KNOW YOUR GRILL
- 4 CONTROL BOARD
-
5
OPERATION
- 5.1 SETTING UP
- 5.2 CONNECTING TO THE APP
- 5.3 SETTING THE TEMPERATURE
- 5.4 USING THE MEAT PROBES
- 5.5 AUGER PRIMING
- 5.6 FIRST USE (BURN-OFF)
- 5.7 PID MODE (REGULAR USE)
- 5.8 SMOKE MODE
- 5.9 MANUAL IGNITION MODE
- 5.10 COOKING & HOT SMOKING
- 5.11 FAN MODE
- 5.12 FLEXIBLE GRID SYSTEM
- 5.13 BLENDING HARDWOODS
- 5.14 SHUT-DOWN
- 6 CARE & MAINTENANCE
- 7 TROUBLESHOOTING
- 8 WIRE DIAGRAM
- 9 IMPORTANT SAFEGUARDS
- 10 References
- 11 Download manual
- 12 In Other Languages
PACKAGE CONTENTS
1 x GRILL & PARTS
1 x HARDWARE BLISTER PACK
2 x MEAT PROBES
1 x ASSEMBLY GUIDE
1 x OWNERS MANUAL
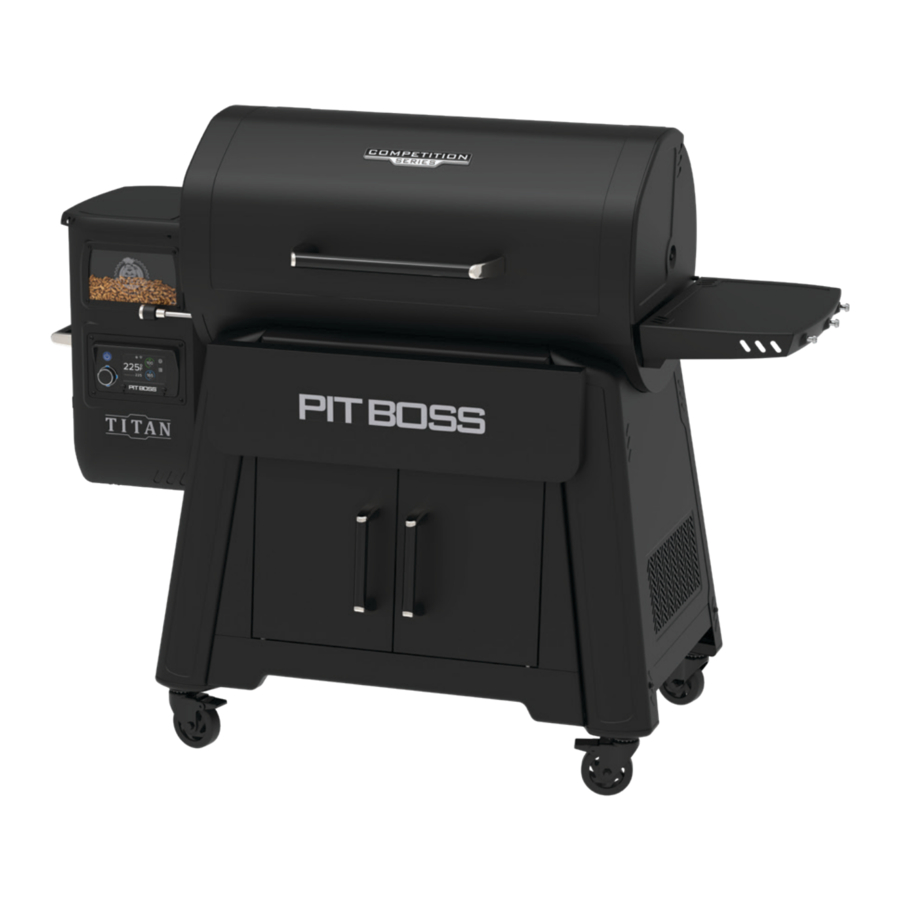
SPECIFICATIONS
| MODEL | PB1600CST |
| POWER SUPPLY | AC 110-120V, 60Hz |
| RATED POWER | 260W |
| FUEL TYPE | HARDWOOD PELLETS |
| FUEL CAPACITY | 18.1 KG/40 LBS |
| TEMPERATURE RANGE | 65-260°C/150-500°F |
| DIMENSIONS | 1,642 X 830 X 1,270 MM/64.6 X 32.6 X 50.0 IN |
| WEIGHT | 120.0 KG/264.5 LB |
GETTING TO KNOW YOUR GRILL

- Hopper Clean-out
Place a large, clean, empty pail underneath the hopper. Pull the clean-out handle outwards to unlock the dropchute plate, allowing the hopper to empty of pellets. Switch between pellet blends to change your flavor profiles while cooking. - Control Board
The control system that manages the feed rate of pellet fuel, the fan speed, and environment settings. - Hopper Handle
Use this inset handle on the hopper to tilt and move the grill from one area to another. Remove the hopper access panel to gain access to the electrical components for repair and maintenance. - Hopper
A bigger hopper to last a full smoking session. The hopper safety screen breaks apart any clumps of fuel when added. Use the Hopper Divider to mix hardwood pellets, dialing in new flavor profiles. See Blending Hardwoods for more information. - Hopper Sight Glass
Easily observe the level of pellets in your hopper without constantly opening the hopper lid. - Flame Broiler™ Adjustment Bar
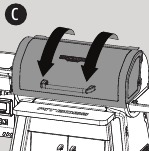
Adjust the flame broiler slide plate safely and easily by moving the bar left or right. - Roll-top Grill Lid
Space saving and easy to lift, the roll-top lid retracts back to access food contents in the grill. Open half-way for a quick-grab, minimizing heat loss. - Front and Side Shelves
Convenient shelves add ample space for food prep and provides hooks for grilling tools. - Grease Bucket
Open the cart cabinet to gain access to the grease bucket. It captures the cooking grease from the grill to keep a clean, cooking area. Easily remove from the undercarriage spout to empty. - Cart Cabinet
The sturdy, two-door cabinet design is perfect for keeping barbecue tools and seasonings nearby. - Grill Probe (Sensor)
This vertical piece of stainless steel measures the internal temperature of the unit. Set the temperature on the control board, then the grill probe will read the internal temperature the unit and adjust to the desired target temperature. - Flame Broiler™ Main Plate
Sear and flame broil to your liking with direct flame over the burn pot. Brand dark lines into meat like your favorite steakhouse. - Flame Broiler™ Slide Plate
Indirect heat, or convection cooking, is possible when the slide plate covers the slits of the main plate. Infuse more flavor into large cuts of meat or delicate foods with indirect heat. - Removable Burn Pot
Open the cart cabinet to gain access. Easily release the buckle latch to remove the burn pot, empty ashes, and return into position. Keep the buckle latch secure to avoid heat loss while in use.
COOKING AREA

- 3,795 CM²/588.3 IN²
- 3,795 CM²/588.3 IN²
- 2,884 CM²/447.1 IN²
- 10,474 CM²/1,623.7 IN²
CONTROL BOARD

- Controller Knob
Navigate, increase or decrease, make selections, and set values. Rotate the wheel to scroll through sub-screen options. Push the Controller Knob to activate a change to the Target grill tempereature. A selection will blink blue when selected for adjustment. Push the Controller Knob to confirm/accept the chosen value or selection, turning it white. - Power Button
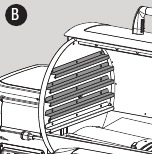
Press and hold for one second to turn on, activating the Start Screen for selection of cooking mode. Press and hold for three seconds to turn off, activating the cool-down cycle. The button will glow blue if unit is connected to a power source. - Display Screen
The touch screen is both the information center and a menu to choose your selections. The screen is very sensitive and requires only a light touch to activate and control. During use, the display screen will show menus and the appropriate selections for the options being chosen. This Start Screen will show by default once the power to the unit is turned on. The display screen will go into screen saver mode if inactive for 5 minutes. - Meat Probe Connection Ports
Plug-in the adapter end of a meat probe to either of the connection ports. The readout will appear on the display screen for the corresponding meat probe selected. The left probe port is P1 and the right probe port is P2. - Target Temperature
Displays the desired target temperature. This is the temperature that is selected by using the Controller Knob. - Actual Temperature
Displays the Actual temperature from inside the main barrel. Readout is taken by the grill probe (sensor). - Operation Icons
An icon is visible when a component is in operation. Should a malfunction occur with a component, an error screen will be displayed. See Troubleshooting for assistance. Run a diagnostics test upon restarting the unit. - Connectivity Icon
Indicates a connectivity with Wi-Fi. When searching for connection, the icon will blink. Once the connection is made, the icon will stay solid. - Settings
This menu allows access to customizing functions and data for your grill. These settings allow you access Smoke Mode and set the P Setting, adjust the display screen brightness, switch the temperature scale, set the screen saver, adjust the start-up temperature, change the language, and more. - Menu
This menu gives access to the Prime function. Selecting this menu will give users the option to dispense a continuous feed of pellets into your grill, or feed pellets for a preset length of time. - Meat Probe Readouts
These two readouts will display the temperature readings of the programmable meat probe(s) connected: the large value is the Actual temperature, small value is the Target temperature. The readout corresponds with the plug-in connection port selected.
START SCREEN
Start Screen
When starting your grill, the Start Screen will show after the Power Button is pressed. The Start Screen will display the cooking mode selections: PID mode (includes Smoke Mode), Manual Ignition Mode, and Fan Mode. Once the cooking mode is selected, the display will appropriately change to the Home Screen of the chosen cooking mode.
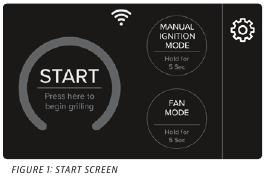
Run Diagnostics
It is useful to perform a quick diagnostics test to help users determine any alerts or malfunctions prior to operation of the unit. The diagnostics test can only be run from the Start Screen.

To run a diagnostics test:
- Touch the Settings menu icon on the Start Screen.
- Select Diagnostic Test to begin the test. The test may take a few moments.
- When the test is done, note the results. If an igniter malfunction has been detected, choose the Manual Ignition Mode to continue.
For other issues, consult Troubleshooting for further diagnosis and corrective actions.
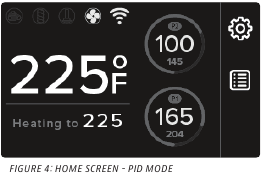
COOKING MODES
PID Mode
This is the default and regular mode of operation. This allows the Grill Probe (temperature sensor) to control how much fuel is required to attain and maintain the desired Target temperature.
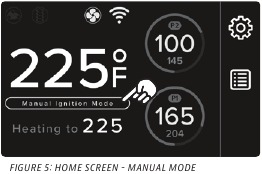
Manual Ignition Mode
If an igniter malfunction or failure has been detected, choose the Manual Ignition Mode to continue the use of your grill. See Manual Lighting Procedure.
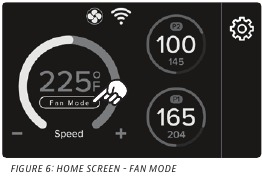
Fan Mode
Use the Fan Mode and a smoke tube (sold separately) to add deep smoke flavors without the use of heat (cold smoke). Light a smoke tube on the grates and let the fan circulate the air inside the grill barrel.
In fan mode, the programmable meat probe(s) can still be used; however, it is important to note that some meat probe Target temperatures may not be attained at lower smoking temperatures.
SETTINGS
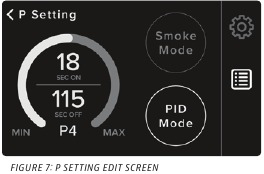
P Setting
PID Mode is the default and regular mode of operation, but users can also activate Smoke Mode from this menu. Selecting Smoke Mode allows the user to directly control the cycle rate of pellets that feed the burn pot. See Smoking at Low Temperatures.
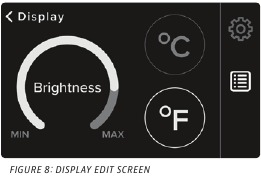
Display
Set the display screen brightness to your preference, and select the temperature scale. Default is set to Fahrenheit (ºF).
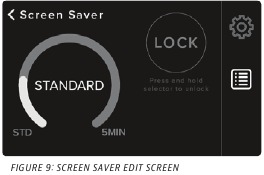
Screen Saver
Select a time to put the display brightness to sleep, then press lock to activate. The display screen will go into screensaver mode and the display screen will lock; however, the Actual and Probe temperatures will remain visible. When the screen or controller knob is touched, slide to unlock the display.
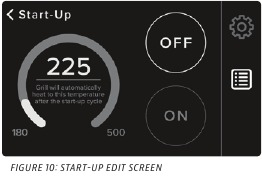
Start-Up
This option allows the user to change the default start-up temperature. The factory setting is 225°F (107°C). Use the Control Knob to modify and select a new start-up temperature, then select ON to activate the new value as your default start-up temperature.
Language
Set your regional preference. Default is English. French and Spanish are also available.

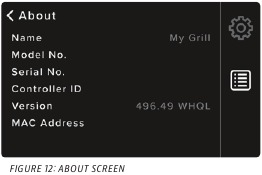
About
Access service and support information about your unit to relay to Customer Care. Displays model number, program start-up code, and unique hardware criteria.
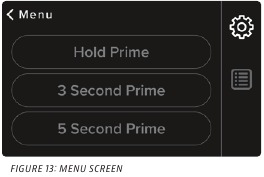
MENU
Prime Menu
Selecting the Hold option will begin a continuous feed of pellets, to a 30 second maximum. Press it again to stop the auger feed. The timed selections will prime for that period length.
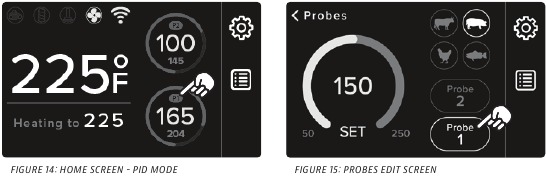
MEAT PROBES
Probes
Displays the temperature reading of the programmable meat probe(s) connected: large value is the Actual temperature, small value is the Target temperature. The readout corresponds with the plug-in connection port selected. In the Probes sub-screen, choose a protein preset (animal icons) or use the Controller Knob to set the desired Target temperature of your choice. The preset temperature of each protein is the safe minimum internal cooking temperature to ensure doneness.
The outer ring indicates the progress of completion from the actual temperature to the desired target temperature, 0-100%. See Using The Meat Probes for more detail.
OPERATION
SETTING UP
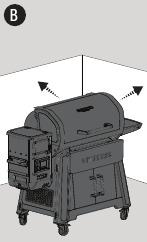
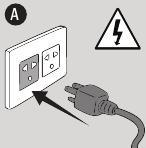
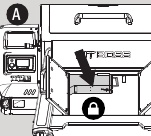
- With all outdoor appliances, outside weather conditions play a big part in the performance of your grill and the cooking time needed to perfect your meals. This appliance must not be placed under an overhead combustible ceiling or overhang (A). Keep your grill in an area clear from combustible materials, gasoline, and other flammable vapors and liquids.
![]()
All Pit Boss® units should keep a minimum clearance of 914mm (36 inches) from combustible constructions and this clearance must be maintained while the grill is operational.
![]()
- Parts are located throughout the shipping carton, including underneath the grill. Inspect the grill, parts, and hardware blister pack after removing from the protective shipping carton. Discard all packaging materials from inside and outside of the grill before assembly, then review and inspect all parts by assembly guide.
If any part is missing or damaged, do not attempt to assemble. Contact your dealer or Pit Boss® Customer Care for parts. - Assemble the unit according to assembly guide instructions.

CONNECTING TO THE APP
The app will allow you to control and monitor your grill and meat probe temperatures from your mobile device. Enjoy the benefits that Pit Boss® mobile connectivity has to offer! Follow these instructions on how to connect your grill to the Pit Boss® app with your Android™ or iOS® device:
- Download the Pit Boss® app. Open the app. Follow the instructions and prompts for a smooth setup. New users will be directed to create an account and login. Choose to "Always allow" location and Bluetooth services for a better experience with mobile connectivity.
- Select your grill model. If you are within Bluetooth® or Wi-Fi range (9 m/30 ft), the Pit Boss® app will detect your unit automatically. Select "Yes" when asked to "Add Grill?". Connect your unit to a power source and power on. Select the correct grill from the list once it pairs. Give your grill a name (ie. My Smoker) and select "Continue".
- Select and connect to your Wi-Fi network. The Pit Boss® app needs a 2.4 GHz signal to connect. This will add your grill model to the list of paired units.
![]()
Any issues with Wi-Fi connection should be done with your internet service provider. At Pit Boss®, our support team cannot offer Wi-Fi troubleshooting or assistance. - After the mobile connection is confirmed, the app may prompt you to do a firmware update. Select "OK." Firmware updates allow the programming to continue efficient operation, fix any bugs, and upgrade security features.
- Once the firmware update is complete, you can begin to control your grill directly through the Pit Boss® app.
SETTING THE TEMPERATURE
The Grill Probe measures the internal temperature of the grill. When the Target temperature is adjusted, the Grill Probe will read the Actual temperature inside the grill barrel and adjust to the desired Target temperature. To adjust the desired Target temperature of the grill, follow the steps below:
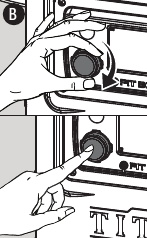
- Press the Controller Knob or touch the Actual Temperature on the screen. The Target temperature will blink to show it is active.
![]()
- Turn the Controller Knob to change the Target temperature value to your desired temperature. Once the desired Target temperature is reached, lock it in by pressing the Controller Knob or touching the Actual Temperature.
![]()
USING THE MEAT PROBES
A meat probe measures the internal temperature of a cut of meat. Plug-in the meat probe adapter to the meat probe connection port and ensure it is inserted all the way into the plug. You will feel and hear it snap in place. Insert the stainless-steel meat probe into the thickest portion of the meat, and the internal temperature is shown on the display screen of the Control Board.
NOTE: Ensure the meat probe and meat probe wires avoid direct contact with flame or excess heat. This can result in damage to your meat probe. When not in use, disconnect and set aside to keep a meat probe protected and clean.
Follow these steps to set your meat probe target temperature:
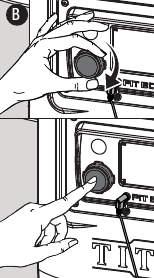
- Plug-in the adapter end of a meat probe into a connection port on the Controller.
![]()
- Touch the display screen or rotate the Controller Knob to select the desired meat probe (P1 or P2) on the display screen. Push the Controller Knob to make the selection.
![]()
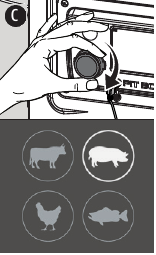
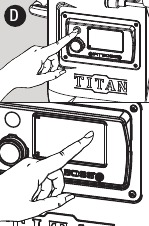
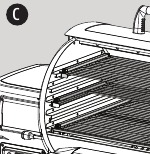
- Use the Controller Knob or choose a protein preset (animal icons) to set the desired target temperature (C). The selected meat probe temperature readout will blink blue while being modified.
![]()
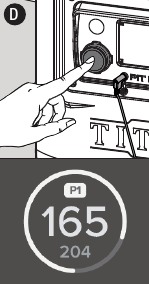
- Once the desired Target temperature of the meat probe is reached/chosen, lock it in by pressing the Controller Knob. The display screen will return to the main screen to show the readings of the programmable meat probe(s) connected: large value is the Actual temperature, small value is the Target temperature.
![]()
NOTE: The protein preset temperatures are set according to USDA cooking standards. To ensure proper cooking of your food, check food at the end of cook time. If food needs more cooking, or needed less, adjust your cooking time accordingly.
P1 and P2 are programmable meat probes. Set the desired Target temperature of a meat probe, and once the meat probe reaches the Target temperature, a beep will sound and a bell icon will appear. Unplug/re-plug to clear the bell icon.
AUGER PRIMING
First time using your grill or whenever your grill runs out of pellets in the hopper, you will need to prime the auger. If not primed, the grill will timeout before the pellets are ignited, and no fire will start. Follow these steps to prime the auger:
- Open the hopper lid. Make sure there are no foreign objects in the hopper or blocking the auger feed system.
- Locate the burn pot in the bottom of the pellet grill. Check the buckle latch on the removable burn pot to ensure it is fastened (locked) for a good seal.
- Plug the power cord into a power source.
- Press and hold the Power Button for one second to turn the unit on. Touch the Settings menu icon on the Start Screen. Select Diagnostic Test to begin the test.
- Once verified that all electric components are working correctly, turn the grill off.
- Fill the hopper with all natural hardwood barbecue pellets.
- Press and hold the Power Button for one second to turn on the unit. Select PID Mode (regular use) from the Start Screen. Touch the Settings menu icon on the Start Screen. Select Prime. Select the five second option and repeat until you hear pellets drop from the auger into the burn pot.
- You now can turn your grill off. Please make sure you allow your grill to stay plugged in until it finishes the shutdown cycle. Once the fan turns off, the grill has completed the shut-down cycle and it is safe to unplug your grill.
- Your grill is now primed and ready to use! If this is the first use of the grill, proceed with a grill burn-off.
FIRST USE (BURN-OFF)
Once your auger has been primed and before cooking on your grill for the first time, it is important to complete a grill burn-off to burn-off the grill and rid it of any foreign matter.
- Follow PID Mode (Regular Use) instructions to turn the unit on.
- Turn the Controller Knob to any temperature over 176°C /350°F (with the lid down) for 30 to 40 minutes.
- Follow Shut-down instructions to turn the unit off, or proceed with grilling at your desired temperature.
PID MODE (REGULAR USE)
Smoking and grilling styles of cooking can give you different results based on time and temperature. For best results, keep a record of what you cooked, at what temperature, how long you cooked for, and the results. Adjust to your taste for the next time. As you become familiar with your grill, it is wise to place an outdoor thermometer close to your cooking area. Practice makes perfect.
Temperature readouts on the control board may not exactly match the thermometer. The cooking temperature is affected by the following factors: outside ambient temperature, the amount and direction of wind, the quality of pellet fuel being used, the lid being opened, and the quantity of food being cooked.
Follow these steps for regular use of your grill:
- Confirm the auger is primed. If not, prime the auger.
- Plug the power cord into a grounded power source.
![]()
- Open the hopper lid to check your level of pellets. Refill with all natural barbecue hardwood pellets if needed.
![]()
- Check the buckle latch on the removable burn pot. Ensure it is fastened (locked) for a good seal.
![]()
- Open the grill lid.
![]()
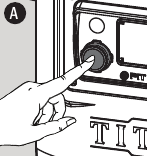
- Press and hold the power button for one second to turn the unit on (E). Select PID Mode (regular use) from the Start Screen. This will activate the start-up cycle:
![]()
- The Control Board will manage the auger feed system, and the fan will supply air to the burn pot. The lid must remain open during the start-up cycle.
- The grill will begin to produce smoke while the start-up cycle is taking place (F). To confirm the start-up cycle has begun properly, listen for a torchy roar, and notice some heat being produced.
![]()
- Once the heavy, white smoke has dissipated, the start-up cycle is complete. Close the grill lid.
![]()
- Press the Controller Knob. Turn the Controller Knob to change the Target temperature value to your desired temperature. Once the desired Target temperature is reached, lock it in by pressing the Controller Knob again and start grilling!
![]()


TIP: Use the Prime function to activate an extra feed of pellets to the burn pot. This can be used to add more fuel to the fire before opening the barrel lid, resulting in a quicker heat recovery time.
SMOKE MODE
When the grill is in PID Mode, the feed rate of pellets is carefully adjusted by the control board, minimizing temperature fluctuations. Switching the grill into Smoke Mode allows the user to infuse more smoke flavor into their food; however, there would be some temperature fluctuation as more smoke is on demand. Users can choose Smoke Mode at the start of a cook or during a cook.
Starting a cook in Smoke Mode:
- Follow PID Mode (regular use) instructions to turn on the unit. Let the grill do the start-up cycle. The default start-up temperature is 107°C/225°F, and this temperature will establish a strong fire in the burn pot. Once the heavy, white smoke has dissipated, the start-up cycle is finished.
- Next, select Settings > P Setting > Smoke Mode. This will activate a timer mode to create more smoke (with less/ minimal heat).
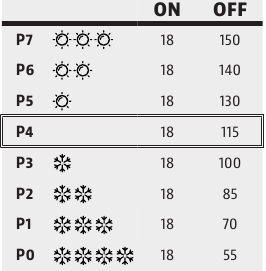
- If you would like to influse smoke at a lower temperature, drop down the Target temperature to 65°C/150°F, activating the P-Setting values. P-Setting values are only adjustable when the Target temperature is set to 65°C/150°F.
- Continue cooking in Smoke Mode, if preferred. If you are satisfied with your extra infusion of smoke or would like to switch back, select Settings > P Setting > PID Mode.
Since environmental conditions can affect the internal cooking temperature of the grill, there can be higher peaks and valleys in temperature readings, but learning to use the P-Setting value based on your geographical location is highly advantageous. Adjust the P-setting value based on your ambient (outdoor) temperature. Default value is P4.
- If your ambient climate is warmer, raise the P-setting to increase the pause time between each feeding of pellets to the burn pot. A higher setting is used in warmer or hot environments that want to hot smoke but the ambient outdoor temperature would amplify the cooking temperature inside the grill.
NOTE: Monitor your burn pot closely, as raising the P-setting too high or too quickly may cause the fire to die out completely. - If your ambient climate is cooler, lower the P-setting to increase the frequency of pellets feeding to the burn pot. A lower setting is used to compensate for cooler temperatures where the ambient outdoor temperature will reduce or weaken the intensity of heat produced inside the grill.
TIP: Lowering the P-setting can also minimize temperature swings in varying outdoor weather conditions.
AUGER CYCLE RATE (IN SECONDS)
Switching to Smoke Mode during a cook:
- Select Settings > P Setting > Smoke Mode. This will activate a timer mode to create more smoke.
- Even though you changed to Smoke Mode, your grill Target temperature remains the same.
- Continue cooking in Smoke Mode, if preferred. If you are satisfied with your extra infusion of smoke or would like to switch back, select Settings > P Setting > PID Mode.
MANUAL IGNITION MODE
If for any reason your electric igniter fails, start your grill using the manual ignition method.
Follow these steps to safely use your grill without a working igniter:
- Confirm the auger is primed. If not, prime the auger.
- Open the hopper lid. Fill the hopper with dry, all natural barbecue hardwood pellets.
- Check the buckle latch on the removable burn pot. Ensure it is fastened (locked) for a good seal.
![]()
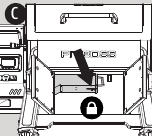
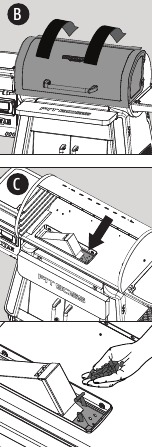
- Open the grill lid (B). Remove the cooking components to expose the burn pot. Check the burn pot to ensure there is no obstruction. Place a generous handful of pellets into the burn pot (C). Squirt a gelled fire starter, or other appropriate pellet starter, over the top of the pellets. A small amount of solid fuel fire starter, such as one composed of sawdust and wax, or wood shavings, is also appropriate. Add another small amount of pellets in the burn pot.
![]()
![]()
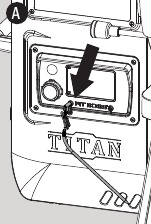
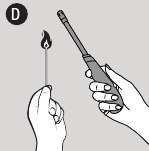
Do not use spirit, petrol, gasoline, lighter-fluid, or kerosene for lighting or refreshing a fire in your grill. - Light the contents of the burn pot using a long match or longnosed lighter (D). Allow the starter to burn for 3 to 5 minutes.
![]()
![]()
Do not attempt to add more fire starter into the burn pot. This can cause injury. - Quickly and carefully replace the cooking components to the inside of the grill body.
- Plug the power cord into a grounded power source.
![]()
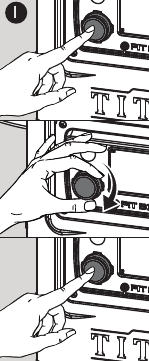
- Press and hold the power button for one second to turn the unit on. Select Manual Ignition Mode from the Start Screen (F). This will activate the start-up cycle:
![]()
- The Control Board will manage the auger feed system, and the fan will supply air to the burn pot.
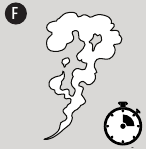
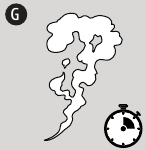
The lid must remain open during the start-up cycle. - The grill will begin to produce smoke while the start-up cycle is taking place (G). To confirm the start-up cycle has begun properly, listen for a torchy roar, and notice some heat being produced.
![]()
- The Control Board will manage the auger feed system, and the fan will supply air to the burn pot.
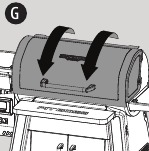
- Once the heavy, white smoke has dissipated, the start-up cycle is complete. Close the grill lid.
![]()
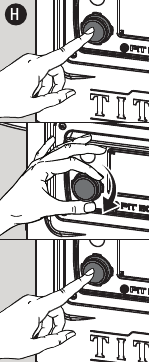
- Press the Controller Knob. Turn the Controller Knob to change the Target temperature value to your desired temperature. Once the desired Target temperature is reached, lock it in by pressing the Controller Knob again and start grilling!
![]()


COOKING & HOT SMOKING
Smoking and grilling styles of cooking can give you different results based on time and temperature. The art of hot smoking refers to longer cooking times, but results in more natural hardwood flavor (and a sought-after smoke ring) on your meats. Higher cooking temperatures result in a shorter cooking time, locking in less smoke flavor.
For best results, allow time for meats to rest after cooking. This allows the natural juices to migrate back into the meat fiber, giving a much juicer, flavorful cut. Resting times can be as little as 3 minutes and up to 60 minutes, depending on the size of the protein.
| MEAT TYPE | COOKING TEMP | ESTIMATED TIME | TARGET TEMP |
| POULTRY | |||
| Turkey (whole) | 110°C/225°F | 30-35 MIN/LB | 74°C/165°F |
| Chicken (whole) | 190°C/375°F | 3-4 HR | 74°C/165°F |
| Drumsticks, Breasts | 190°C/375°F | 1-2 HR | 74°C/165°F |
| Small Game Birds | 190°C/375°F | 1-2 HR | 74°C/165°F |
| Duck | 135°C/275°F | 2-3 HR | 74°C/165°F |
| PORK | |||
| Ham (whole) | 120°C/250°F | 15-20 MIN/LB | 71°C/160°F |
| Roast | 190°C/375°F | 3-4 HR | 74°C/165°F |
| Spare Ribs | 120°C/250°F | 4 HR | 88°C/190°F |
| Baby Back Ribs | 95°C/200°F | 3-4 HR | 88°C/190°F |
| Tenderloin | 110°C/225°F | 1.5 HR | 82°C/180°F |
| Butt (Shoulder) | 110°C/225°F | 1.5 HR/LB | 90-98°C/195-210°F |
| BEEF | |||
| Steak | 120°C/250°F | 8-10 MIN | 60°C/140°F |
| Tenderloin | 110°C/225°F | 2-3 HR | 60°C/140°F |
| Roast | 110°C/225°F | 3-4 HR | 63°C/145°F |
| Spare Ribs | 110°C/225°F | 3-4 HR | 79°C/175°F |
| Prime Rib | 120°C/250°F | 15-20 MIN/LB | 57°C/135°F |
| Brisket | 110°C/225°F | 1 HR/LB | 90-98°C/195-210°F |
| WILD GAME | |||
| Tenderloin | 110°C/225°F | 1-2 HR/LB | 74°C/165°F |
| Roast | 120°C/250°F | 1-2 HR/LB | 74°C/165°F |
| SEAFOOD | |||
| Fillets | 110°C/225°F | 30-45 MIN | 63°C/145°F |
| Salmon (whole) | 95°C/200°F | 2-3 HR | 63°C/145°F |
| Lobster | 95°C/200°F | 2-3 HR | 63°C/145°F |
FAN MODE
Enhance the savory taste of wood smoke flavor into any vegetable, meat, or cheese by cold smoking. Use a Pit Boss® Smoke Tube, or an A-Maze-N Smoker Maze, to smoke without the exposure to heat in your grill. Typical cold smoke times range from 2 to 12 hours; however, some cold smoke times may be longer. Foods such as cheese, spices and vegetables typically require less smoke time. Meats, such as bacon and ham, will be smoked for a longer period of time.
Follow these steps to use the Fan Mode for cold smoking:
- Fill a Pit Boss® Smoke Tube with hardwood pellets according to product instructions.
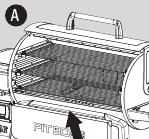
- Open the grill lid. Set the Pit Boss® Smoke Tube directly on the cooking grates (A). Ensure it is level so it burns consistently.
![]()
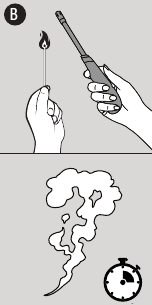
- Light the pellets through the open end (B). Once a small flame has appeared, allow the flame to burn for 10 minutes. Softly blow on the embers to make sure the pellets are burning well.
![]()
- After 10 minutes and once the pellets are burning well, blow the flame out and add your foods to the grill. Close the grill lid.
![]()
- Press the Power Button to turn the unit on. Select Fan Mode from the Start Screen (D). This will turn on the fan for continuous airflow.
![]()

A Pit Boss® Smoke Tube, or an A-Maze-N Smoker Maze, is a smoke generator, and designed to produce smoke only. They do not produce enough heat to cook foods. Most foods will still need a heat source for cooking.
FLEXIBLE GRID SYSTEM
From adjustable shelves to removable sections, the flexible grid system can be customized to your every need. With independent and removable grid frames on each level, switch the layout of your grill, get some more cooking space, and do it all in minutes. Easily convert your grill to suit different food types, giving you cooking flexibility for everyday needs as well as special occasions.
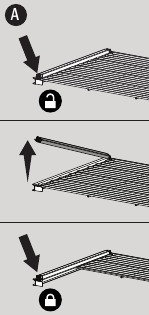
- The two large grids include four independent grid frames, while the top grid includes three independent grid frames, offering ample flexibility on the horizontal plane. The thoughtfully designed grid bars can be lifted by loosening the grid bar locking screw. Remove one or more grid frames, lower the grid bar and secure the screw back into the locked position (A). Each level can also be pulled out half-way should items become out of reach.
![]()
- On the vertical plane, choose from the any of the grid brackets for optimal height flexibility (B). The height between bracket levels is perfect for fitting sheet pans or shorter food items.
![]()
TIP: If you are cooking tall food items, like a turkey or a beer-can chicken, remove two grid frames from your center cooking grid to free up some vertical space, and it will still leave space on that level for other items.
BLENDING HARDWOODS
Whether you prefer strong or subtle smoke, or sweet or savory flavoring, mixing hardwood pellets will dial in new flavor profiles to your food. Blending different ratios of pellets can introduce different smoke flavors, elevating your barbecue game to the next level.
To start experimenting with blending hardwoods, follow these steps:
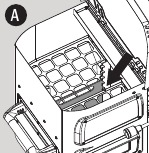
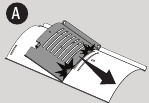
- Begin with an empty hopper. Insert the Hopper Divider into the lowest notch setting.
![]()
NOTE: The lowest notch will have the most even distribution of pellets from each compartment. The higher notches will add a blend of pellets less balanced in ratio.
![]()
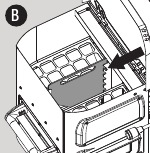
- Add the dominant flavor of pellets to the rear compartment of the hopper. Add a secondary flavor of pellets to the front (sight glass window) compartment of the hopper.
- Proceed to prime your hopper and begin regular use of your grill.
NOTE: For best results, keep a record of what you cooked, what type of pellets were used, the notch height of the Hopper Divider, and the results. Adjust to your taste for the next time and continue to experiment with different blends of hardwoods.
SHUT-DOWN
Follow these steps to safely turn off your grill:
- Press and hold the Power Button for three seconds to turn the unit off.
![]()
- The grill will begin its automatic shut-down cycle. The auger system will stop feeding fuel, the flame will burn out, and the fan will continue to run until the shut-down cycle is complete.
- Once the shut-down cycle is complete (fan turns off), unplug the power cord.
![]()

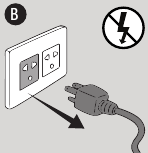
Always power off the appliance and allow the shut-down cycle to run. Unplug the appliance only once the shut-down cycle is complete, and/or before cleaning. Failure to follow this warning can cause damage, serious injury, fire, electric shock, or death.
CARE & MAINTENANCE
Any Pit Boss® unit will give you many years of flavorful service with minimum cleaning. Follow these tips to service your grill:
Grill Interior
- Use a grill cleaning brush to remove any food or build-up from the cooking grates. Best practice is to do this while they are still warm from a previous cook.
- Grease fires are caused by too much fallen debris on the cooking components of the grill. Use the flame broiler slide plate to scrape off the main plate, and vice versa (A). Remove the debris from inside your barrel with a wet/dry vacuum. For an extra deep clean, use Pit Boss® Cleaner & Degreaser for the grill interior and exterior.
![]()
Due to high heat, do not cover the flame broiler components with aluminum foil.
Grill Exterior
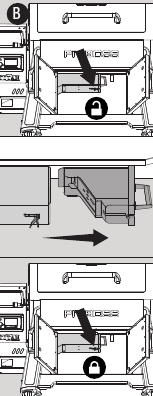
- Underneath the grill barrel is a removable burn pot feature, giving you easy access to remove your burn pot and easily clean it out. To remove, release the buckle latch from the hook. While holding the handle, slide the removable burn pot away from the buckle, then pull down to remove. Once emptied, replace the burn pot into position by lifting it back into the channel under the grill barrel, then sliding the burn pot towards the buckle. Fasten the hook with the buckle latch to ensure a proper seal.
![]()
![]()
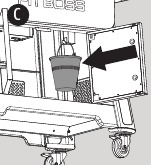
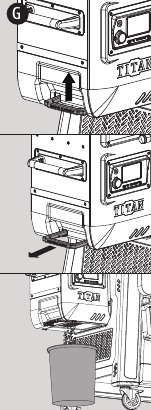
This feature can only be used when the grill is cooled down. - Check your grease bucket often, and clean out as necessary. Keep in mind the type of cooking you do.
![]()
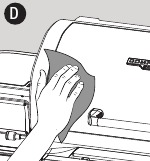
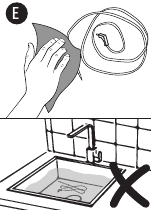
- Wipe your grill down after each use (D). Use warm soapy water to cut the grease. Do not use oven cleaner, abrasive cleansers, or abrasive cleaning pads on the outside grill surfaces. All painted surfaces are not covered under warranty, but are rather part of general maintenance and upkeep. For paint scratches, wearing, or flaking of the finish, all painted surfaces can be touched up using a high heat BBQ paint.
![]()
- A grill cover is your best protection against weather and outside pollutants. When not in use or for longterm storage, keep the unit under a cover in a garage or shed.
Probes
- Wipe your meat probe after each use. A meat probe not in use should be rolled up in a large, loose coil. Kinks or folds in the probe wires may cause damage. Do not place in the dishwasher or submerge in water. Water damage to the internal wires will cause a meat probe to short-out, causing false readings.
![]()
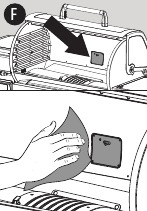
- Remove the cooking grates. Check and clean off any grease or debris from the grill probe (sensor), found inside the main grill body, on the center of the backside wall.
![]()
- If a probe is damaged, it should be replaced.
Hopper Assembly
- The hopper includes a hopper clean-out feature to allow for easy cleaning and the ability to change out wood pellet fuel flavors. To empty, locate the hopper clean-out handle on the side of the hopper. Place a clean, empty pail underneath the hopper, as the pellets will exit from the bottom. Pull the hopper clean-out handle to unlock the access plate, allowing the pellets to empty from below. Once empty, lift up the hopper clean-out handle and push inward to lock the access plate into its closed position.
![]()
- Removing all pellets from the hopper and out of your auger system is recommended if your grill will be unused for an extended period of time. This can be done by emptying out your hopper and running your grill on an empty hopper, until all pellets have emptied from the auger tube.
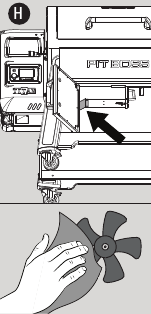
- Check and clean off any debris from the fan air intake vent, found on the bottom of the ash clean-out feature, within the grill cart enclosure. Once the fan access panel has been removed, carefully wipe off any grease build-up directly on the fan blades. Use warm soapy water to cut the soot and grease. This ensures airflow is clean and sufficient to the burn system.
![]()
GRILL CARE CHEAT SHEET
| ITEM | CLEANING FREQUENCY | CLEANING METHOD |
| Air Intake Vent | Every Few Months | Dust, Cloth & Soapy Water |
| Auger Feed System | When Pellet Bag is Empty | Allow Auger to Push Out Sawdust, Leaving Hopper Empty |
| Bottom of Main Grill | Every 5-6 Grill Sessions | Scoop Out, Wet/Dry Vacuum Out Excess Debris |
| Burn Pot | Every 2-3 Grill Sessions | Scoop Out, Wet/Dry Vacuum Out Excess Debris |
| Cooking Grates | After Each Grill Session | Burn Off Excess, Brass Wire Brush |
| Flame Broiler™ | Every 5-6 Grill Sessions | Scrape Main Plate with Slider, Do Not Wash Clean |
| Grease Bucket | After Each Grill Session | Cloth & Soapy Water |
| Grill Probe (Sensor) | Every 2-3 Grill Sessions | Cloth & Soapy Water |
| Hopper Electric Components | Once A Year | Dust Out Interior, Wipe Fan Blades with Soapy Water |
| Shelves | After Each Grill Session | Cloth & Soapy Water |
TROUBLESHOOTING
Proper cleaning, maintenance, and the use of clean, dry, quality fuel will prevent common operational problems. When your Pit Boss® grill is operating poorly, or on a less frequent basis, the following troubleshooting tips may be helpful.

Always disconnect the electrical cord prior to opening the grill for any inspection, maintenance, cleaning, or service work. Ensure the grill is completely cooled to avoid injury.
| PROBLEM | CAUSE | SOLUTION |
| No power lights on the control board | Not connected to power source | Ensure unit is plugged into a working power source. Ensure a minimum 10 amp service. Ensure all wire connections are firmly connected and dry. |
| Fuse blown on the control board | Remove the four screws holding the control board in place. Carefully pull the control board forward to inspect the backside. Check the fuse for a broken wire or if the wire has turned black. If yes, fuse needs to be manually replaced. | |
| Faulty control board | Control Board needs to be replaced. Contact Customer Care for a replacement part. | |
| Fire in burn pot will not light | Start-up temperature is set too low | Check your start-up temperature. If set too low, the igniter will have difficulty lighting the pellets. We recommend setting no lower than 225°F (107°C), as the auger will feed enough pellets to ignite a fire in the burn pot. |
| Auger not primed | Before the unit is used for the first time or anytime the hopper is completely emptied out, the auger must be primed to allow pellets to fill the auger tube. If not primed, the igniter will timeout before the pellets reach the burn pot. Follow Auger Priming Procedure. | |
| Igniter not installed correctly | Remove cooking components from the main barrel. Visually confirm that the igniter is flush with the igniter tube. If not operating properly, call Customer Care for assistance or a replacement part. | |
| Grill will not achieve or maintain stable temperature | Insufficient air flow through burn pot | Check burn pot for ash build-up or obstructions. Follow Care and Maintenance instructions for ash build-up. Check fan. Ensure it is working properly and air intake is not blocked. Follow Care and Maintenance instructions if dirty. Check auger motor to confirm operation, and ensure there is no blockage in the auger tube. Once all the above steps have been done, start the grill and wait for 10 minutes. Check that the flame produced is bright and vibrant. |
| Removable burn pot not installed properly | Check underneath the grill barrel to verify placement of the removable burn pot from under the grill barrel has a good seal. Follow Care and Maintenance instructions for ash build-up, proper fastening of the buckle latch, and correct installation. Contact Customer Care for a replacement part if damaged. | |
| Lack of fuel, poor fuel quality, obstruction in feed system | Check hopper to check that fuel level is sufficient, and replenish if low. Should the quality of hardwood pellets be poor, or the length of the pellets too long, this may cause an obstruction in the feed system. Remove pellets and follow Care and Maintenance instructions. | |
| Grill probe (sensor) | Check status of Grill Probe (Sensor). Follow Care and Maintenance instructions if dirty. Contact Customer Care for a replacement part if damaged. | |
| The grill temperature at low temp is still too hot | P Setting is too low | Adjust the P Setting from within the Settings. Increase the P Setting to increase the pause time between each feeding of pellets to the burn pot. This is often the case in warmer or hot environments that want to hot smoke but the ambient outdoor temperature would amplify the cooking temperature inside the grill. Be sure to only increase the P Setting slowly, as raising it too high or too quickly may cause the fire to die out completely. |
| Actual temperature will not adjust | Grill Probe dirty | Check status of Grill Probe. Follow Care and Maintenance instructions if dirty. |
| Grill produces excess or discolored smoke, food is discolored from smoke | Grease build-up | Follow Care and Maintenance instructions. |
| Hardwood pellet quality | Remove moist hardwood pellets from hopper. Follow Care and Maintenance instructions to clean out. Replace with dry hardwood pellets. | |
| Burn pot is blocked | Clear burn pot for moist hardwood pellets. Follow Auger Priming Procedure. | |
| Insufficient air intake for fan | Check fan. Ensure it is clean, working properly, and air intake is not blocked. Follow Care and Maintenance instructions if dirty. | |
| Frequent flare-ups | Cooking temperature | Attempt cooking at a lower temperature. Grease does have a flash point. Keep the temperature under 176°C/350°F when cooking highly greasy food. |
| Grease build-up on cooking components | Follow Care and Maintenance instructions. | |
| ERH Malfunction | The unit has overheated, possibly due to grease fire or excess fuel. | Press and hold the Power Button for three seconds to turn the unit off, and allow grill to cool. Follow Care and Maintenance instructions. After maintenance, remove pellets, and confirm positioning of all component parts. Once cooled, press the Power Button to turn the unit on, then select desired temperature. If error code still displayed, contact Customer Care. |
| ERP Malfunction | Grill probe wire not making connection. | Remove the access panel and check for any damage to the Grill Probe wires. Disconnect and reconnect the Grill Probe connectors to the Control Board. |
| Grill Probe is broken | Grill Probe need to be replaced. Contact Customer Care for a replacement. | |
| ERL Malfunction | Grill fails to perform start-up cycle. | Check proper positioning of cooking components. Check hopper for sufficient fuel or if there is an obstruction in the feed system. Remove pellets and follow Care and Maintenance instructions. Check Grill Probe (Sensor) to confirm if actual temperature is correct and accurate. Follow Care and Maintenance instructions if dirty. Check igniter positioning and that it is heating up properly. In extreme cold, the grill may require a second start. Turn grill off, wait, then turn on again. Check fan. Ensure it is working properly. Follow Care and Maintenance instructions if dirty. |
| Auger Malfunction | Auger motor is jammed, not making connection | Remove cooking components from the main barrel. Turn the unit on and inspect the auger feed system. Visually confirm that the auger is dropping pellets into the burn pot. Disconnect and reconnect the Auger Motor connector to the Control Board. If not operating properly, call Customer Care for assistance or a replacement part. |
| Igniter Malfunction | Igniter is not working properly, not making a connection | Remove cooking components from the main barrel. Turn the unit on and inspect the igniter. Visually confirm that the igniter is working by placing your hand above the burn pot and feeling for heat. Visually confirm that the igniter is aligned with the hole in the burn pot, and open to light the pellets. Disconnect and reconnect the Igniter connector to the Control Board. If not operating properly, call Customer Care for assistance or a replacement part. |
| Igniter failure | Igniter needs to be replaced. Contact Customer Care for replacement part. | |
| Fan Malfunction | Fan is not working properly, not making a connection | Check fan. Ensure it is working properly and air intake is not blocked. Remove access panel (see Electric Wire Diagram for diagram), and check for any damage to the fan wires. Disconnect and reconnect the Fan connector to the Control Board. Follow Care and Maintenance instructions if fan blades are dirty. |
| Pellet Malfunction | Lack Of Fuel, Poor Fuel Quality, Grill will not stay lit | Check hopper to check that fuel level is sufficient and replenish if low. Should the quality of Hardwood pellets be poor, or the length of the pellets too long, this may cause an obstruction in the feed system. Remove pellets and follow Care and Maintenance instructions. |
WIRE DIAGRAM
| POWER SUPPLY | AC 110-120V, 60Hz |
| RATED POWER | 260W |
| FUEL INPUT RATING | 1.12 KG/H/2.48 LB/H |
NOTE: Electrical components, passed by product safety testing and certification services, comply with a testing tolerance of ± 5-10 percent.

| INDEX | |
| K | black |
| W | white |
| R | red |
| Y | yellow |
| P | purple |
| G | green |
| B | blue |
IMPORTANT SAFEGUARDS
IMPORTANT, READ CAREFULLY, RETAIN FOR FUTURE REFERENCE. MANUAL MUST BE READ BEFORE OPERATING!
MAJOR CAUSES OF APPLIANCE FIRES ARE A RESULT OF POOR MAINTENANCE AND A FAILURE TO MAINTAIN REQUIRED CLEARANCE TO COMBUSTIBLE MATERIALS. IT IS OF UTMOST IMPORTANCE THAT THIS PRODUCT BE USED ONLY IN ACCORDANCE WITH THE FOLLOWING INSTRUCTIONS.

Please read the entire manual before installation and use of this electric, pellet fuel burning appliance. Failure to follow these instructions could result in property damage, bodily injury, or even death. Contact local building or fire officials about restrictions and installation inspection requirements in your area. Save these instructions.
PROPOSITION 65 - CALIFORNIA
This product can expose you to chemicals including wood dust, which is known to the State of California to cause cancer, and carbon monoxide, which is known to the State of California to cause birth defects or other reproductive harm. For more information go to WWW.P65WARNINGS.CA.GOV
You must contact your local home association, building or fire officials, or authority having jurisdiction, to obtain the necessary permits, permissions, or information on any installation restrictions, such as any grill being installed on a combustible surface, inspection requirements, or even ability to use, in your area.
- A minimum clearance of 914mm (36 inches) from combustible constructions to the sides of the grill, and 914mm (36 inches) from the back of the grill to combustible constructions must be maintained. Do not install appliance on combustible floors, or floors protected with combustible surfaces unless proper permits and permissions are obtained by authorities having jurisdiction. Do not use this appliance indoors, in an enclosed or unventilated area, inside homes, vehicles, tents, garages. This hardwood pellet appliance must not be placed under overhead combustible ceiling or overhang. Keep your grill in an area clear and free from combustible materials, gasoline, and other flammable vapors and liquids.
![]()
Be aware of building combustible material, maintain the fire to avoid over-firing. Should a grease fire occur, turn the grill OFF and leave the lid closed until the fire is out. Unplug the power cord. Do not throw water on the unit. Do not try to smother the fire. Use of an all-class (class ABC) approved fire extinguisher is valuable to keep on site. If an uncontrolled fire does occur, call the Fire Department. - Keep electrical supply cords and the fuel away from heated surfaces. Do not use your grill in the rain or around any water source. If the supply cord is damaged, it must be replaced by the manufacturer, its service agent, or similar qualified persons in order to avoid a hazard.
- After a period of storage, or non-use, check the burn pot for obstructions, the hopper for foreign objects, and any air blockage around the fan intake or chimney. Clean before use. Regular care and maintenance is required to prolong the lifespan of your unit. If the grill is stored outside during the rainy season or seasons of high humidity, care should be taken to insure that water does not get into the hopper. When wet or exposed to high humidity, hardwood pellets will expand greatly, decompose, and may jam the feed system. Always disconnect the power, before performing any service or maintenance.
![]()
Always power off the appliance and allow the shut-down cycle to run. Unplug the appliance only once the shut-down cycle is complete, and/or before cleaning. Failure to follow this warning can cause damage, serious injury, fire, electric shock, or death.
![]()
Do not transport your grill while in use or while the grill is hot. Ensure the fire is completely out and that the grill is completely cool to the touch before moving. - It is recommended to use heat-resistant barbecue mitts or gloves when operating the grill. Do not use accessories not specified for use with this appliance. Do not put a barbecue cover or anything flammable in the storage space area under the barbecue. Remove pots and pans while the operating appliance is unattended, to reduce the risk of fire.
- To prevent fingers, clothing, or other objects from coming in contact with the auger feed system, the appliance is equipped with a metal safety screen, mounted to the interior of the hopper. This screen must not be removed unless directed by Customer Care or an authorized dealer.
![]()
This appliance is not recommended for children, persons with reduced physical, sensory or mental capabilities, or lack of experience and knowledge, unless they are under direct supervision or instruction by a person responsible for their safety. - Parts of the barbecue may be very hot, and serious injury may occur. Keep young children and pets away while in use.
- Do not enlarge igniter holes or burn pot. Failure to follow this warning could lead to a fire hazard and bodily harm and will void your warranty.
- Product may have sharp edges or points. Contact may result in injury. Handle with care.
HARDWOOD PELLET FUEL
This pellet cooking appliance is designed and approved for pelletized, all natural hardwood fuel only. Any other type of fuel burned in this appliance will void the warranty and safety listing. Use only wood pellet fuel specified by the manufacturer. Do not use pellet fuel labeled as having additives. Hardwood pellets are highly susceptible to moisture and should always be stored in an airtight container. If you are storing your grill, without use, for an extended period, we recommend clearing all pellets from your grill's hopper and auger, to prevent jams. The pellet fuel mean heating value in 18,569-20,362 KJ/KG (8,000-8,770 BTU/LB), ash content < 1%.
Never use gasoline, gasoline-type lantern fuel, kerosene, charcoal lighter fluid, or similar liquids to start or 'freshen up' a fire in this appliance. Keep all such liquids well away from the appliance when in use.
At the time of printing, there is no industry standard for barbecue hardwood pellets, although most pellet mills use the same standards to make hardwood pellets for domestic use. Further information, can be found at www.pelletheat.org or the Pellet Fuel Institute.
Contact your local dealer on the quality of pellets in your area, and for information on brand quality. As there is no control over the quality of pellets used, moisture affected pellets, we assume no responsibility to damage caused by poor quality of fuel.
CREOSOTE
Creosote - formation, and need for removal. When burning, it produces black smoke with a residue that is also black in color. When wood pellets are burned slowly, they produce tar and other organic vapors that combine with expelled moisture to form creosote. The creosote vapors condense in a relatively cool oven flue and exhaust hood of a slow-burning fire. As a result, creosote residue accumulates on the flue lining and exhaust hood. When ignited, this creosote makes an extremely hot fire.
The grease duct should be inspected at least twice a year to determine when the grease and/or creosote buildup has occurred. When grease or creosote has accumulated, it should be removed to reduce the risk of fire.
CARBON MONOXIDE
Follow these guidelines to prevent this colorless, odorless gas from poisoning you, your family or others:
- Know the symptoms of carbon monoxide poisoning: headache, dizziness, weakness, nausea, vomiting, sleepiness, and confusion. Carbon monoxide reduces the blood's ability to carry oxygen. Low blood oxygen levels can result in loss of consciousness and death.
- See a doctor if you or others develop cold or flu-like symptoms while cooking or in the vicinity of the appliance. Carbon monoxide poisoning, which can easily be mistaken for a cold or flu, is often detected too late.
- Alcohol consumption and drug use increase the effects of carbon monoxide poisoning.
Carbon monoxide is especially toxic to mother and child during pregnancy, infants, the elderly, smokers, and people with blood or circulatory system problems, such as anemia, or heart disease.
HAVE A QUESTION?
Check out some common FAQs online or Live Chat with Customer Care.

USA
8877 N Gainey Center Dr,
Scottsdale, AZ 85258
480-923-9630
CANADA
15110 Yellowhead Trail NW,
Edmonton, AB T5V 1A1
877-942-2246
NETHERLANDS
Unit 8, De Hootkamp 8,
Hedel, NL 5321 JT
service-eu@dansons.com
WWW.PITBOSS-GRILLS.COM
References
![www.pelletheat.org]() Pellet Fuels Institute
Pellet Fuels Institute![www.p65warnings.ca.gov]() http://www.p65warnings.ca.gov
http://www.p65warnings.ca.gov![www.pitboss-grills.com]() Pit Boss Grills | Wood Pellet Grills | Flat Top Griddles | BBQ Smokers
Pit Boss Grills | Wood Pellet Grills | Flat Top Griddles | BBQ Smokers

Download manual
Here you can download full pdf version of manual, it may contain additional safety instructions, warranty information, FCC rules, etc.
Download PIT BOSS COMPETITION Series, TITAN PB1600CST Manual


